
Control library
The control library is the central repository where you can view, document, and maintain your internal controls. These controls used to prevent or detect errors or fraud, to help achieve strategic goals, and to ensure that financial and other information is accurate and reliable. You can access the Control Library via the Left menu: Compliance, then Control Library.
Overview
This overview will walk you through the Control Library from top to bottom.
Add control

- At the top of the page, you can add a new control by clicking + Add control.
Learn more about adding controls here: Add control - It's also possible to bulk upload controls by clicking on the file icon to bulk upload.
Learn more about bulk uploading controls here: Bulk upload control TO DO - You’ll also find a quick link to this article using the Docs: Control Library button.
Control status
TO DO
Control Library Table
In the Control Library, you’ll find a table listing all controls across your organisation, including their control phase, associated risks, and key ownership fields.
Search, filter, bulk actions, and export

Above the table of internal controls, you will find options to search, filter, apply bulk actions, and export. From left to right:
- Search: You can search by title or ID.
- Clear search: Quickly clear your search field and stop searching using this button.
- Filters: Apply filters using this button. If any filters are active, the text will change to Filters applied.
- Saved filters (↓ down arrow): You will find your saved filter sets here, as well as a button to save your current set of filters.
- Clear filters (strikethrough funnel): This will clear all filters, including any text in the search field.
- Bulk actions: If multiple rows have been selected, you can perform a bulk action on the selected rows.
- Initiate control self-assessment: This bulk action can be used to initiate ecosystem assessments for all selected controls.
Learn more about internal control self-assessments here: Control self-assessments
- Initiate control self-assessment: This bulk action can be used to initiate ecosystem assessments for all selected controls.
- Export: Export controls to an Excel file.
- All results: This exports all controls in your organisation.
- Applied filter: This exports all controls that have been found using the filters you have enabled.
- Selected rows: This exports all controls you have selected in the table.
- Number of rows per page: Choose the amount of rows you want displayed per page in the table.
Interacting with the table
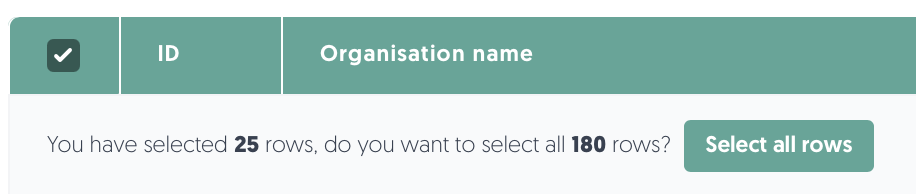
- Select: Check the box in the leftmost column to select a row. You can select all visible controls by checking the box in the header of the table. If you want to select all results, including ones on other pages, make sure to click Select all rows:
- Sort: Click on a column name to sort by that column. Note: sorting is not possible on some columns.
- Details: Hover or click on a data field to get more details.
Actions
You’ll find the actions menu (•••) on the right side of each row. Available actions include:
- Edit (sub)control: Update control information, ownership, or status. Link risks and issues.
Learn more about editing (sub)controls here: Edit a control - Create subcontrol: Create a subcontrol under an existing control.
- Archive: Remove control from view.
Learn more about removing (sub)controls here: Archive a control - Link issue/risk: Quickly link an issue or risk to the control.
- Initiate control self-assessment: Initiate a control self-assessment batch as part of implementing a new control, an audit project, or an incident that signals a deficiency.
Learn more about internal control self-assessments here: Control self-assessments
Control Lifecycle
The 3rdRisk platform supports the full lifecycle of a control, from identifying a risk to evaluating the control’s long-term effectiveness. Each control can be assigned a lifecycle status: Plan, Design, Implement, Execute. This helps your organisation track progress and assign responsibilities at each phase. Additionally, to Test, and Evaluate & Improve controls, you can use control self-assessments.
Below is a breakdown of each phase and how it's supported on the platform:
1. Plan
The planning phase is where the need for a control is first established. It involves identifying risks and determining how they should be addressed. This phase includes the following steps:
- Identify the risk: Understand what threat or compliance requirement the control should mitigate. This may involve regulations, internal policies, or insights from threat intelligence.
- Assess the risk: Evaluate the likelihood and potential impact of the risk materialising.
Learn more about assessing risks here: Risk management
Once the risk is identified and assessed: - Create an issue linked to the risk to capture the findings.
Navigate in the Left menu: Risks. For the risk you would like to control, click on the ••• button in the Actions column on the right-hand side of the table. Click on Link issue.
Learn more about the risk register here: Risk register
Identify or describe the control that could best mitigate the risk. This may be a new control or an adjustment of an existing one.
Learn more about issues here: Issues - Create or link an action plan to the issue: Outline the steps, responsibilities, and timelines for designing and implementing the control.
Learn more about action plans here: Action plans
- If you're ready to document the control, click on + Add control in the Control Library and set the Phase to Plan. This status helps indicate that the control is not yet finalised. Don't forget to create or link a new or existing issue (see step 3) and action plan (see step 4).
- Other available phases are design, implement and execute. Please note that you can always change the status of a control, e.g, from implement to design, when needed.
2. Design
In the design phase, the control is defined in detail. This includes drafting specific procedures, identifying control objectives, and writing testing guidelines.
- To define a control in greater detail, click on Edit control.
Learn more about Editing controls here: Editing control - You can update the phase to Design by clicking on Edit control to track controls that are still being developed or reviewed.
- Provide progress updates via the issue linked to the control. Quickly notify and communicate with relevant stakeholders in the Communication tab in the issue.
Learn more about issues here: Issues
3. Implement
Once designed, the control must be implemented across the organisation. This means:
- Communicating procedures to relevant staff.
- Conducting training.
- Ensuring technical or manual steps are in place.
- Performing checks to confirm the control is functioning as intended.
- Controls in this stage should be marked with the Implement status.
- You can update the phase to Implement by clicking on Edit control when the control is being implemented.
Learn more about Editing controls here: Editing control - Provide progress updates via the issue linked to the control. Quickly notify and communicate with relevant stakeholders in the Communication tab in the issue.
Learn more about issues here: Issues
4. Execute
The execution phase is where the control becomes part of routine operations. The control is now actively running and mitigating risks. Execution includes:
- Ensuring staff follow the defined procedures.
- Monitoring the control’s daily performance.
- Correcting any deviations. This can be done by linking a new or existing issue.
Learn more about issues here: Issues - You can update the phase to Execute by clicking on Edit control when the control is executed and in effect.
5. Testing and Evaluating & Improving
Control testing is typically part of the Internal Control Self-Assessment process.
Learn more about internal control self-assessments here: Control self-assessments
Initiating internal control self-assessments
To initiate an internal control self-assessment:
- On the left-hand side of your screen, navigate to: Compliance -> Control Library.
- For the control you would like to initiate an assessment, click on the ••• button in the Actions column on the right-hand side of the table.
- Click on Initiate control self-assessment.
- Or -
Bulk select multiple controls in the table and click on Bulk action to Initiate control self-assessment for multiple controls at once.
Learn more about internal control self-assessments here: Control self-assessments
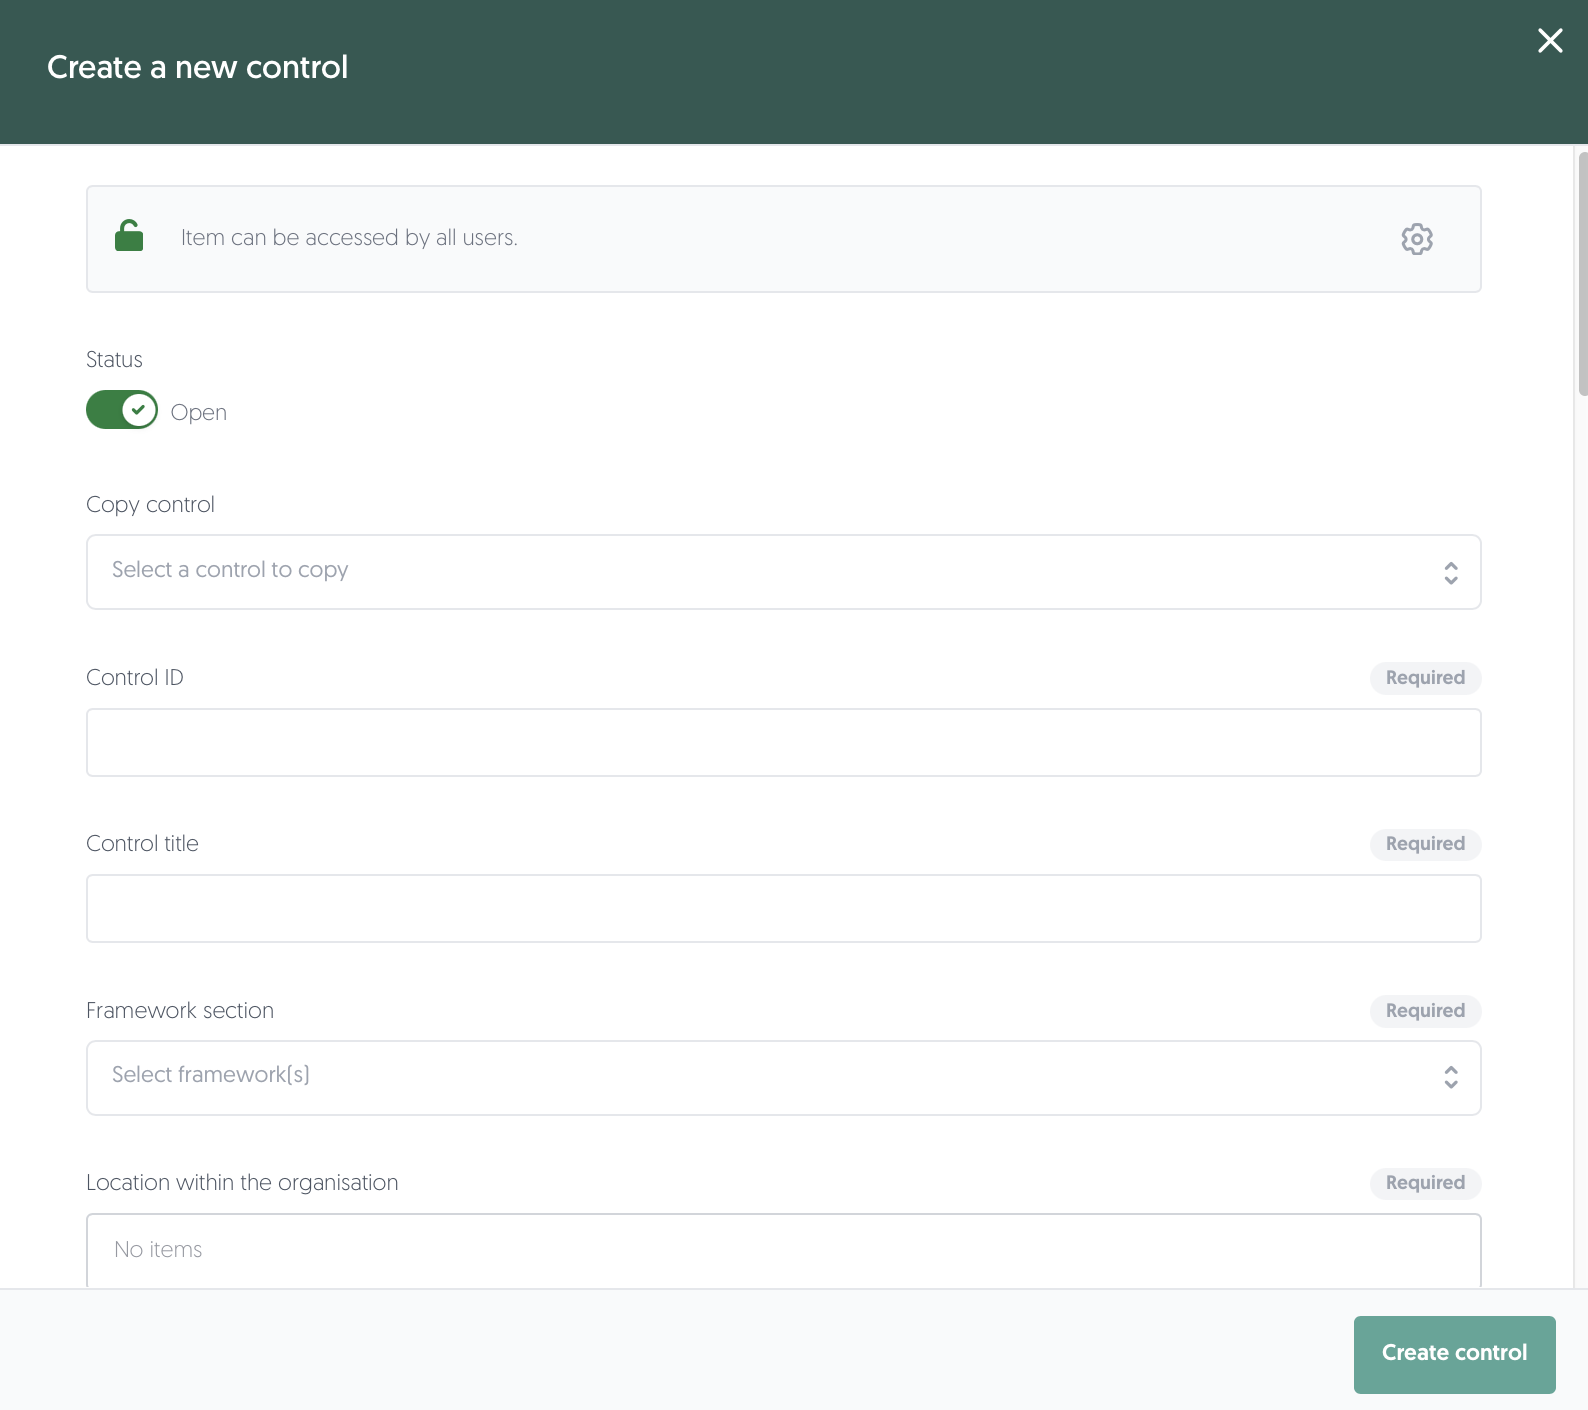
Adding a control
To create a (sub)control in the Control library:
- On the left-hand side of your screen, navigate to: Compliance, then Control library.
- Click on Add control. For subcontrols: click on the ••• button in the Actions column on the right-hand side of the table for the control you want to add a subcontrol to.
- Fill in the fields of the control. To learn more about a specific field, hover over the field's name.
- Fill in a unique Control ID. Subcontrols automatically start with the parent control name but need an additional ID to differentiate them. Subcontrols automatically take over other fields from its' parent as well.
- Select the framework that the control belongs to.
Learn more about frameworks here: Frameworks - Add a physical and/or organisational location to the control.
- Select which risks the control aims to address.
- Give a description of the working of the control and describe how the control should be tested. You can upload a video to make it easier.
- Select the phase the control is in.
Learn more about control phases here: Control lifecycle - Assign ownership of the control. See table below.
- Fill in control attributes. Additionally, you can add relationships to the control. You can relate third parties, contracts, assets and associated issues. Add tags for your own use.
- Click on Save. The issue has been created. Additional tabs are now visible, namely Action plans, Documents, Communication and Notes.
Learn more about the additional tabs here: Additional tabs
| Field | Description |
| Control owner | This representative is end-responsible for the design, implementation and execution of the control. |
| Control executor | This representative is responsible for executing the control on a daily basis. This is usually a delegate of the control owner. |
| Control validator | This representative is responsible for validating the self-test results by the control owner or control executor. This can be somebody from the 2nd or 3rd line of defense. |
| Control auditor | This representative is responsible for verifying the self-test results of the control owner and control validator. This is usually somebody from the internal or external audit team. |
Bulk upload
to do
Subcontrols
- Subcontrols can be used as specific instances or smaller sections of a broader control to better manage a risk.
- Subcontrols allow you to apply a single control concept in a consistent yet adaptable way across different locations, systems, business units, or scenarios.
- Instead of having one owner for a broad control, allocate ownership per subcontrol for better accountability, local relevance and clearer follow-up on execution and testing.
Editing a control
To edit a (sub)control:
- On the left-hand side of your screen, navigate to: Compliance, then Control library.
- For the (sub)control you would like to edit, click on the ••• button in the Actions column on the right-hand side of the table.
- Click on Edit (sub)control.
- Update the issue and save your changes by clicking on Save.
Archive a control
Controls cannot be completely removed from the platform for data integrity and auditing purposes. However, they can be removed from active use and view by using the Archive action. Click on the ••• button in the Actions column on the right-hand side of the table. Then, click on Archive and confirm the action. Archived controls can be viewed selecting is archived in the table filters.