
Action plans
Action plans help your organisation follow up on reported issues in a structured, trackable way. They allow you to assign responsibility, set deadlines, and monitor progress, all in one central place. You can access the Action Plan register via the Left menu: Action plans.
Video

Overview
This overview will walk you through the Action Plan register and explain how to create and edit an Action Plan, from the top to the bottom of the Action Plans page.
Create action plan

- At the top of the page, you can create a new action plan by clicking + Create new action plan.
Learn more about creating action plans here: Create an action plan - You will also find a quick link to this article about the Action Plan register using the button Docs: Action plans.
Timeline
The timeline gives you a clear, visual overview of when action plans kicked off and how long they’ve been active.
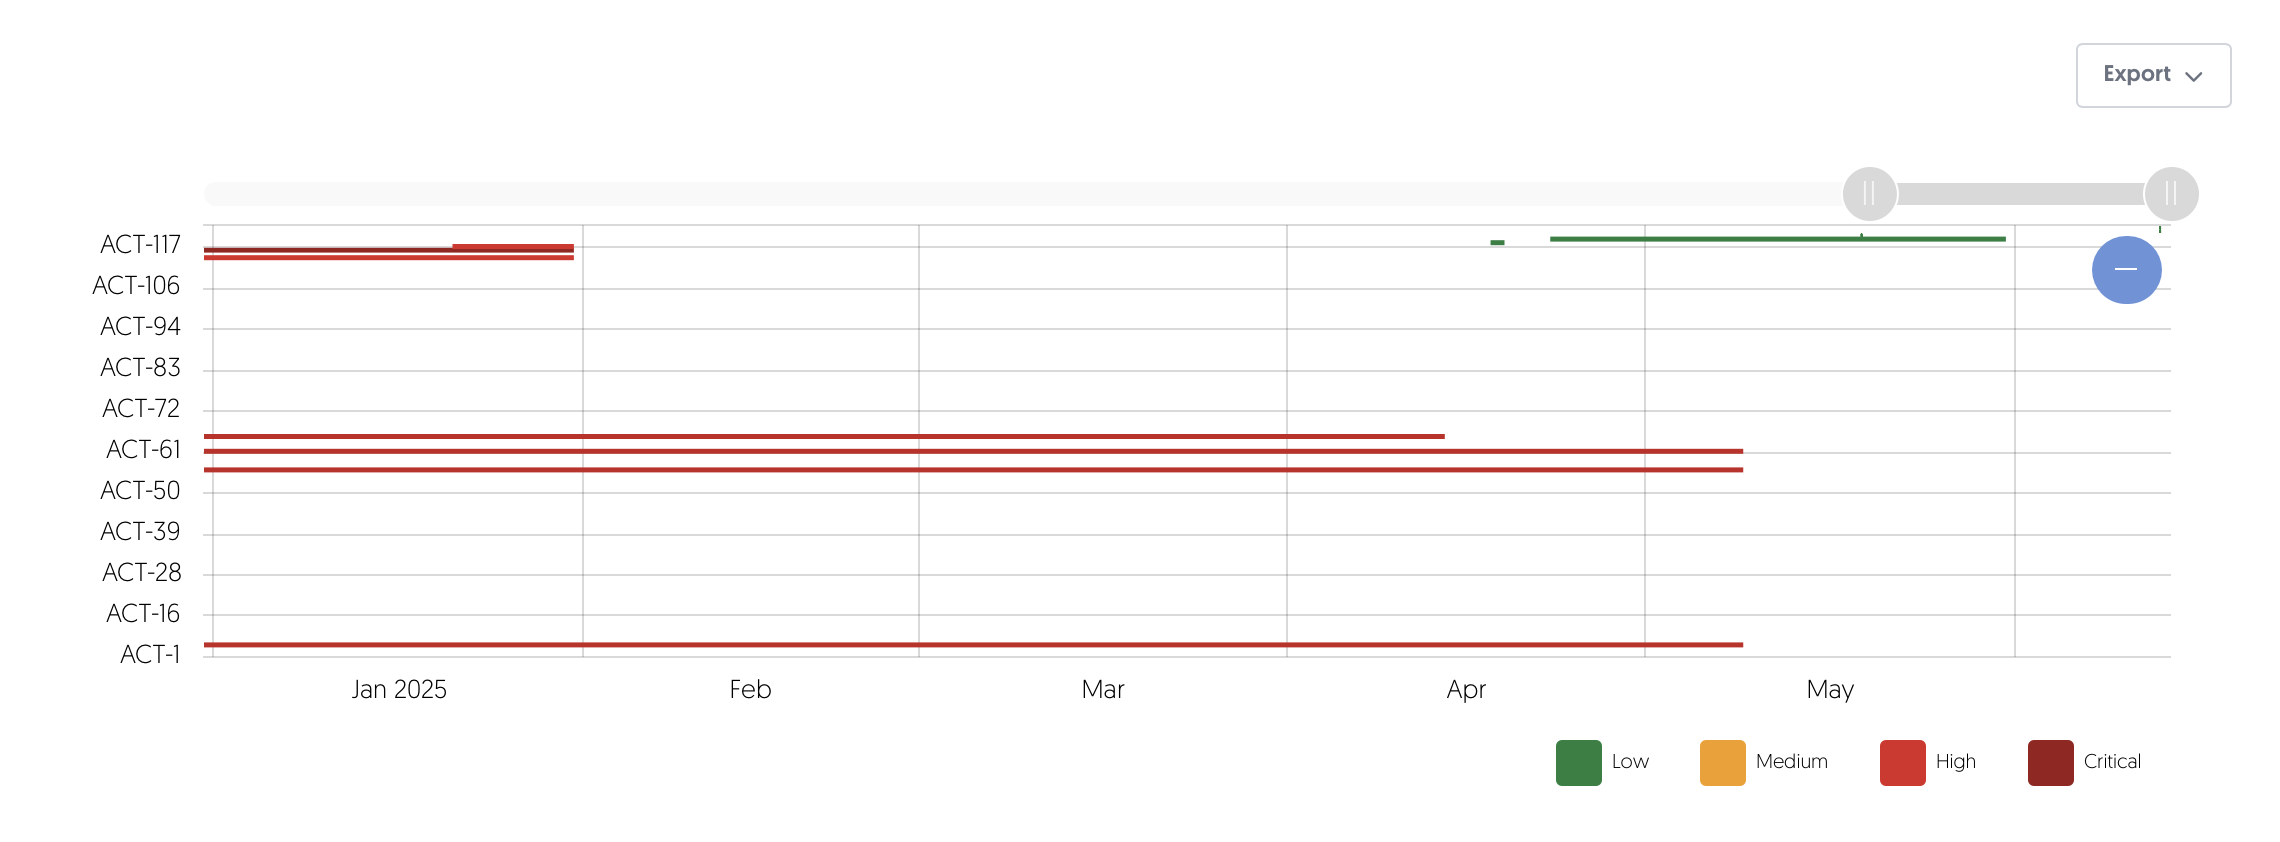
- Each action plan is color-coded by criticality.
- Adjust the time frame using the slider. Click on the - button to reset the slider.
- Hover over an action plan to get more details.
- Export the timeline as a PNG.
Table
In the Action Plan register, the table gives you a detailed overview of all existing action plans.
Search, filter, and export

Above the table, you will find options to search, filter, and export. From left to right:
- Search: You can search by title and ID.
- Clear search: Quickly clear your search field and stop searching using this button.
- Filters: Apply filters using this button. If any filters are active, the text will change to Filters applied.
- Saved filters (↓ down arrow): You will find your saved filter sets here, as well as a button to save your current set of filters.
- Clear filters (strikethrough funnel): This will clear all filters, including any text in the search field.
- Export: Export Action Plans to an Excel file.
- All results: This exports the entire Action Plan register.
- Applied filter: This exports all action plans that have been found using the filters you have enabled.
- Selected rows: This exports all action plans you have selected in the table.
- Number of rows per page: Choose the amount of rows you want displayed per page in the table.
Interacting with the table
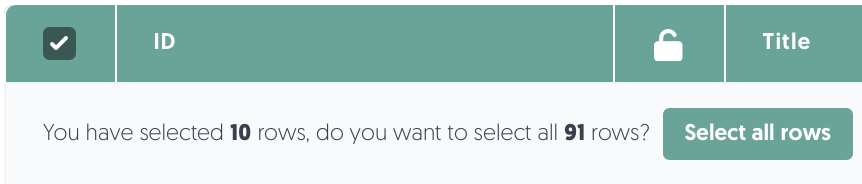
- Select: Check the box in the leftmost column to select a row. You can select all visible action plans by checking the box in the header of the table. If you want to select all results, including ones on other pages, make sure to click Select all rows:
- Sort: Click on a column name to sort by that column. Note: sorting is not possible on some columns.
Actions
You can find the actions menu ••• in the rightmost column. There, you will find the following menu options:
- Edit Action Plan: Edit the Action Plan's general information, upload documents, communicate internally, and add notes.
Learn more about editing action plans here: Edit an action plan
Create an action plan
To create an action plan in the Action Plan register:
- On the left-hand side of your screen, navigate to: Action Plans.
- Click on Create new action plan.
- Fill in the fields of the action plan.
- All action plans have an owner and a person to act. Often the owner is a manager, while the person to act carries out the task.
- The owner and person to act will automatically be notified when, the action plan is created and when the due date is approaching or has passed.
- To disable notifications, toggle off the update alerts in the action plan's general tab.
- Link associated issues that need attention in this action plan.
You can also directly create a new action plan when working in the issue module. Doing this, automatically associates the issue that needs action to the action plan.
Learn more about associated issues here: Issues - Click on Save. The action plan has been created. Additional tabs are now visible, namely Documents, Communication and Notes.
Learn more about the additional tabs here: Additional tabs
Additional tabs
The following tabs are visible after creating a new issue or when editing an issue.
General tab
- The General tab contains the basic information of the action plan.
- The General tab also includes sections to relate the action plan to other elements in the platform, such as third parties, risks and issues.
Documents
- In the Documents tab, you can attach relevant documents that belong to the action plan. To add a new document, you can click on Add document.
Communication
- The Communication tab gives you the ability to communicate with colleagues about the issue.
Notes
- This section provides the option to leave notes that are only visible internally. Your colleagues might want to know about relevant context, past decisions, history, or important observations that don’t belong in formal documentation.
- You could also use the Notes section to add implementation updates for keeping track of progress.
- You can add a note by using the Add note button.
- Please note that Notes is not designed for internal communications. For communicating with colleagues, we recommend to using the Communication tab and reach out to that colleague directly.
Edit an action plan
To edit an action plan in the Action Plan register:
- On the left-hand side of your screen, navigate to: Action Plans.
- For the action plan you would like to edit, click on the ••• button in the Actions column on the right-hand side of the table.
- Click on Edit action plan.
- Update the issue and save your changes by clicking on Save and Close.
Closing an action plan
To close an action plan in the Action Plan register:
- On the left-hand side of your screen, navigate to: Action Plans.
- For the action plan you would like to close, click on the ••• button in the Actions column on the right-hand side of the table.
- Click on Edit action plan.
- In the Edit action plan window, toggle the Status from Active to Closed.
- Click on Save and Close.
- Closing completed action plans on time keeps the timeline accurate and up to date.