
Ecosystem assessments
Take a systematic approach to evaluate and determine the risk exposure within your ecosystem. Create, schedule, perform and monitor, generic or tailor-made, third-party risk assessments for all your third-parties.
You can find the Ecosystem Assessment phases via the Left menu: Ecosystem. Then, select the phase of ecosystem assessments you want to see.
Note: you need explicit user permissions for each phase. Contact your system administrator to gain access.

Overview
This overview will walk you through ecosystem assessments pages from the top to the bottom. Additionally, key steps of the ecosystem assessment are explained in greater detail down below.
Initiate assessment

- At the top of the page, you can initiate a new assessment batch by clicking + Initiate assessment.
Learn more about initiating an assessment here: Initiating an assessment - You will also find a quick link to this article about ecosystem assessments using the button Docs: Ecosystem assessments.
Ecosystem assessment table
The table shows an overview of ecosystem assessments with the status in progress, review, verification or finished depending on which phase of assessment you select and have access to. Additionally, the tab overview displays all assessments, overdue provides an overview of assessments past the due date and finished shows all past, finished assessments.
Search, filter, bulk actions, and export

Above the table, you will find options to search, filter, and export. Note: the available options vary per page. From left to right:
- Search: You can search by title and ID.
- Clear search: Quickly clear your search field and stop searching using this button.
- Filters: Apply filters using this button. If any filters are active, the text will change to Filters applied.
- Saved filters (↓ down arrow): You will find your saved filter sets here, as well as a button to save your current set of filters.
- Clear filters (strikethrough funnel): This will clear all filters, including any text in the search field.
- Bulk actions: Perform actions on multiple assessments simultaneously.
- Export: Export ecosystem assessments to an Excel file.
- All results: This exports all ecosystem assessments.
- Applied filter: This exports all ecosystem assessments that have been found using the filters you have enabled.
- Selected rows: This exports all ecosystem assessments you have selected in the table.
- Number of rows per page: Choose the amount of rows you want displayed per page in the table.
Interacting with the table
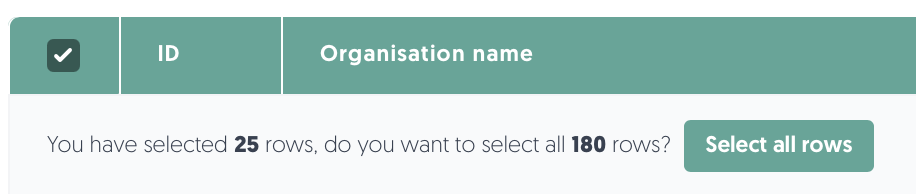
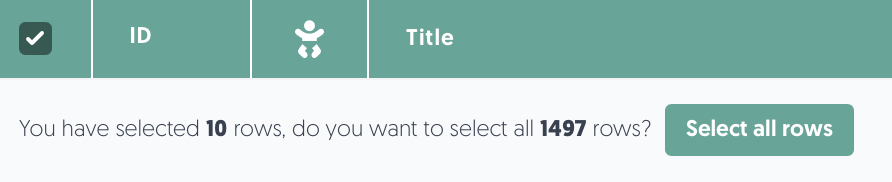
- Select: Check the box in the leftmost column to select a row. You can select all visible ecosystem assessments by checking the box in the header of the table. If you want to select all results, including ones on other pages, make sure to click Select all rows:
- Sort: Click on a column name to sort by that column. Note: sorting is not possible on some columns.
- Details: Hover or click on a data field to get more details.
Actions
- View an assessment
View the assessment page structure: Assessment page structure - Review assessment: Review a submitted assessment.
Learn more about reviewing assessments: Reviewing assessments - Verify assessment: Verify a reviewed assessment.
Learn more about verifying assessments: Verifying assessments - Only available for in progress assessments:
- Canceling an assessment: Close the assessment. Useful if you made a mistake or the assessment no longer needs to be filled out. Cancelled assessments can be viewed under Ecosystem, then Cancelled in the Left menu.
- Sending a reminder: Send out an email reminder to the third party to fill out the assessment via the assessment portal. Can be performed via bulk action.
- Changing the due date: Re-open the assessment portal by changing the due date. An email reminds the third party to fill out the assessment before the new due date. Can be performed via bulk action.
- 2-factor authentication (2FA): When a third-party assessment user has activated 2-factor authentication (2FA) and has lost their 2FA device, you can reset (i.e. disable) 2FA for the user.
Ecosystem assessment process
In Third-Party Risk Management (TPRM), understanding who you're working with and how they impact your organisation is critical. The Ecosystem Assessment module helps you systematically evaluate your third parties to uncover risks and ensure compliance with growing regulatory requirements around third-party governance.
The ecosystem assessment process is designed to structure and standardise the way you evaluate risks related to third parties, highlighting areas that require attention and enabling timely follow-up through issues and action plans. All in one centralised, auditable process.
The ecosystem assessment process consists of 4 steps, all of which are outlined in this article:
- Initiating the assessment
- Filling in the assessment (by third party)
- Reviewing the assessment
- Verifying the assessment
Note: to initiate an assessment, you need a prepared questionnaire to send out.
Learn more about questionnaires: Questionnaires
1. Initiate an assessment
The first step of the ecosystem assessment process is to initiate the assessment.
To initiate an ecosystem assessment:
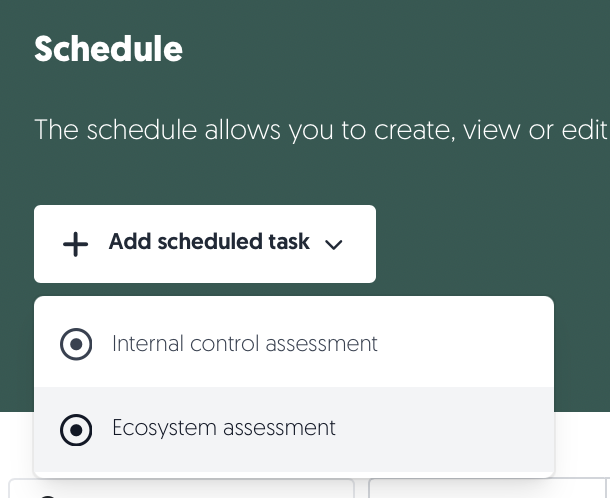
- Navigate via the Left menu: Schedule.
- Click + Add scheduled task, then Ecosystem assessment.
-or-
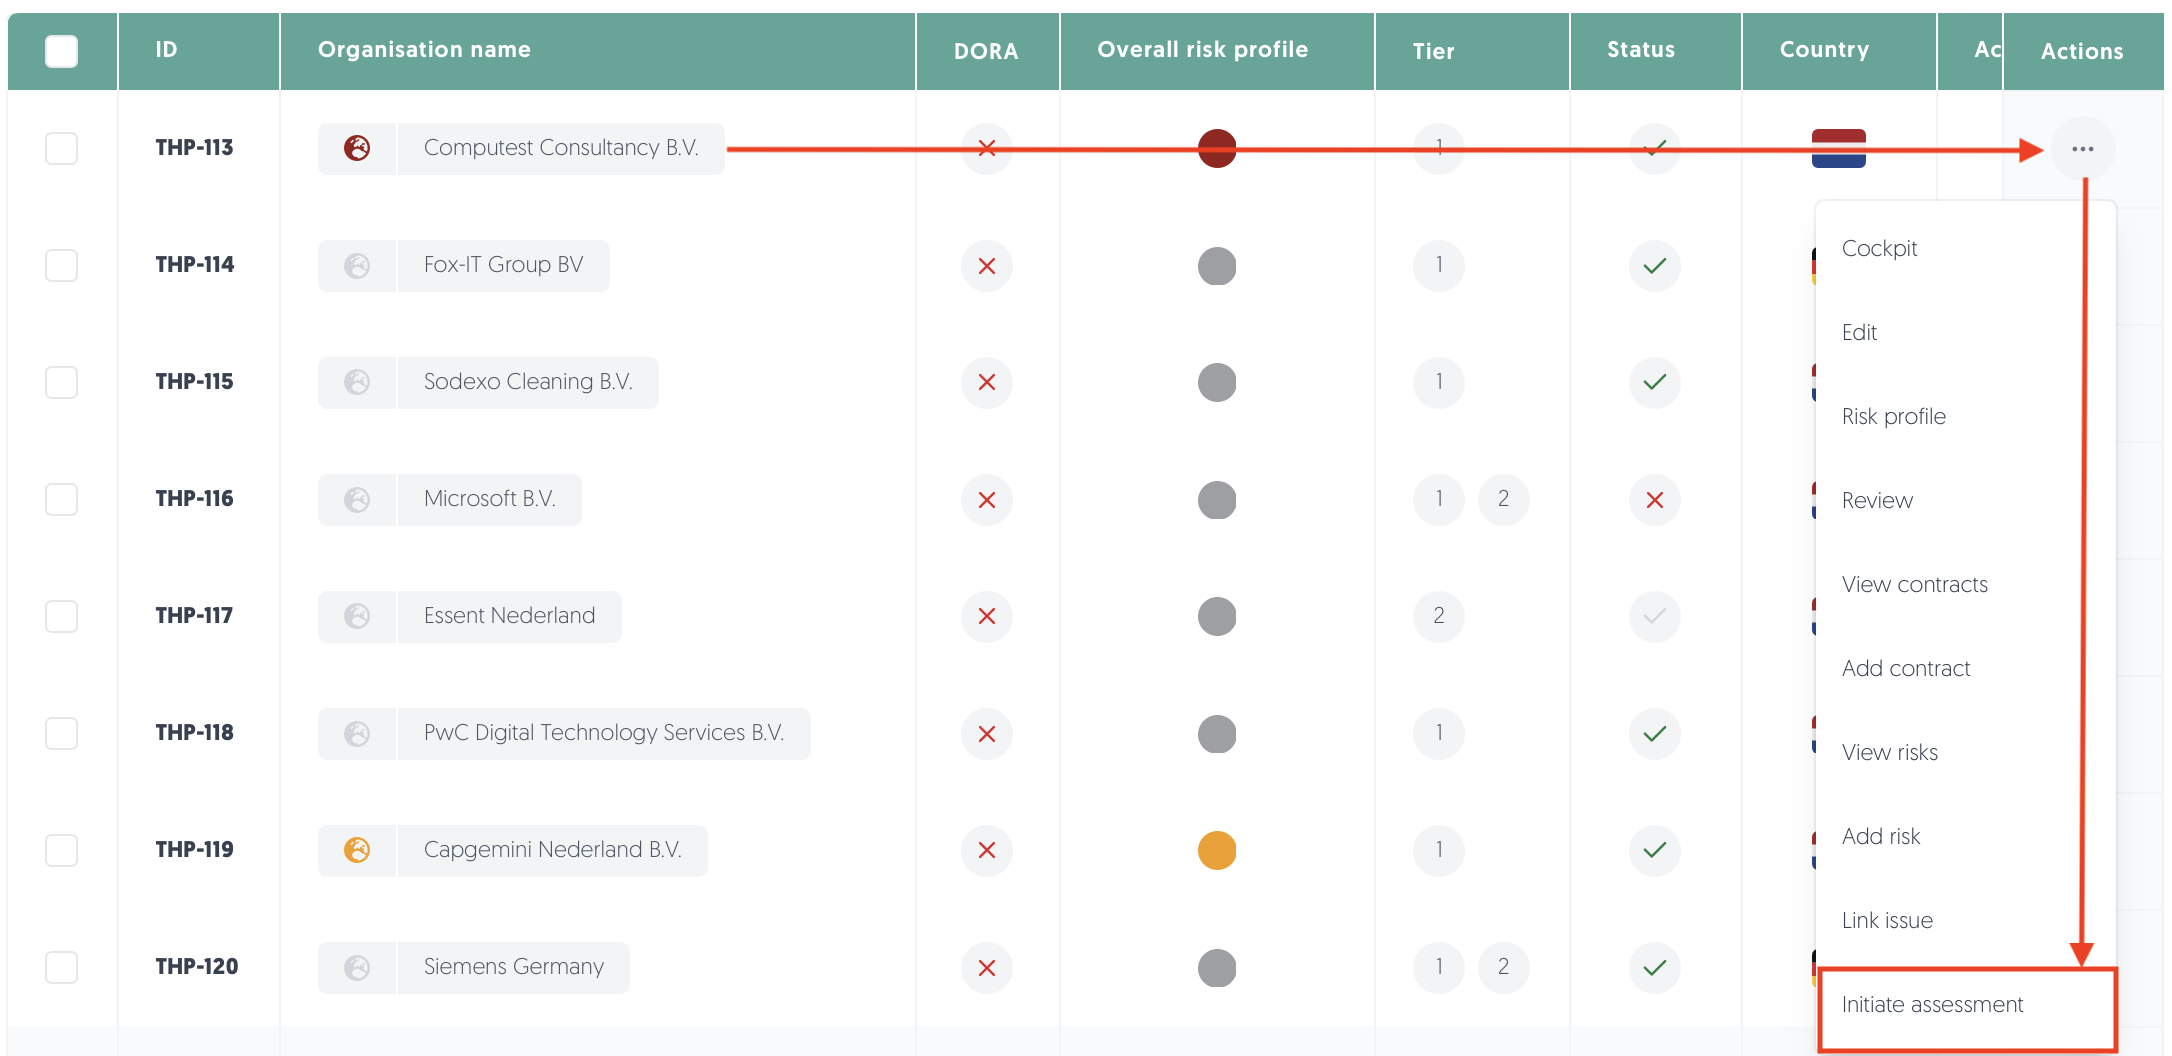
- Navigate to: Third-parties, then Catalogue.
- For the third-party you would like to assess, click on the ••• button in the Actions column on the right-hand side of your screen. Click on Initiate assessment.
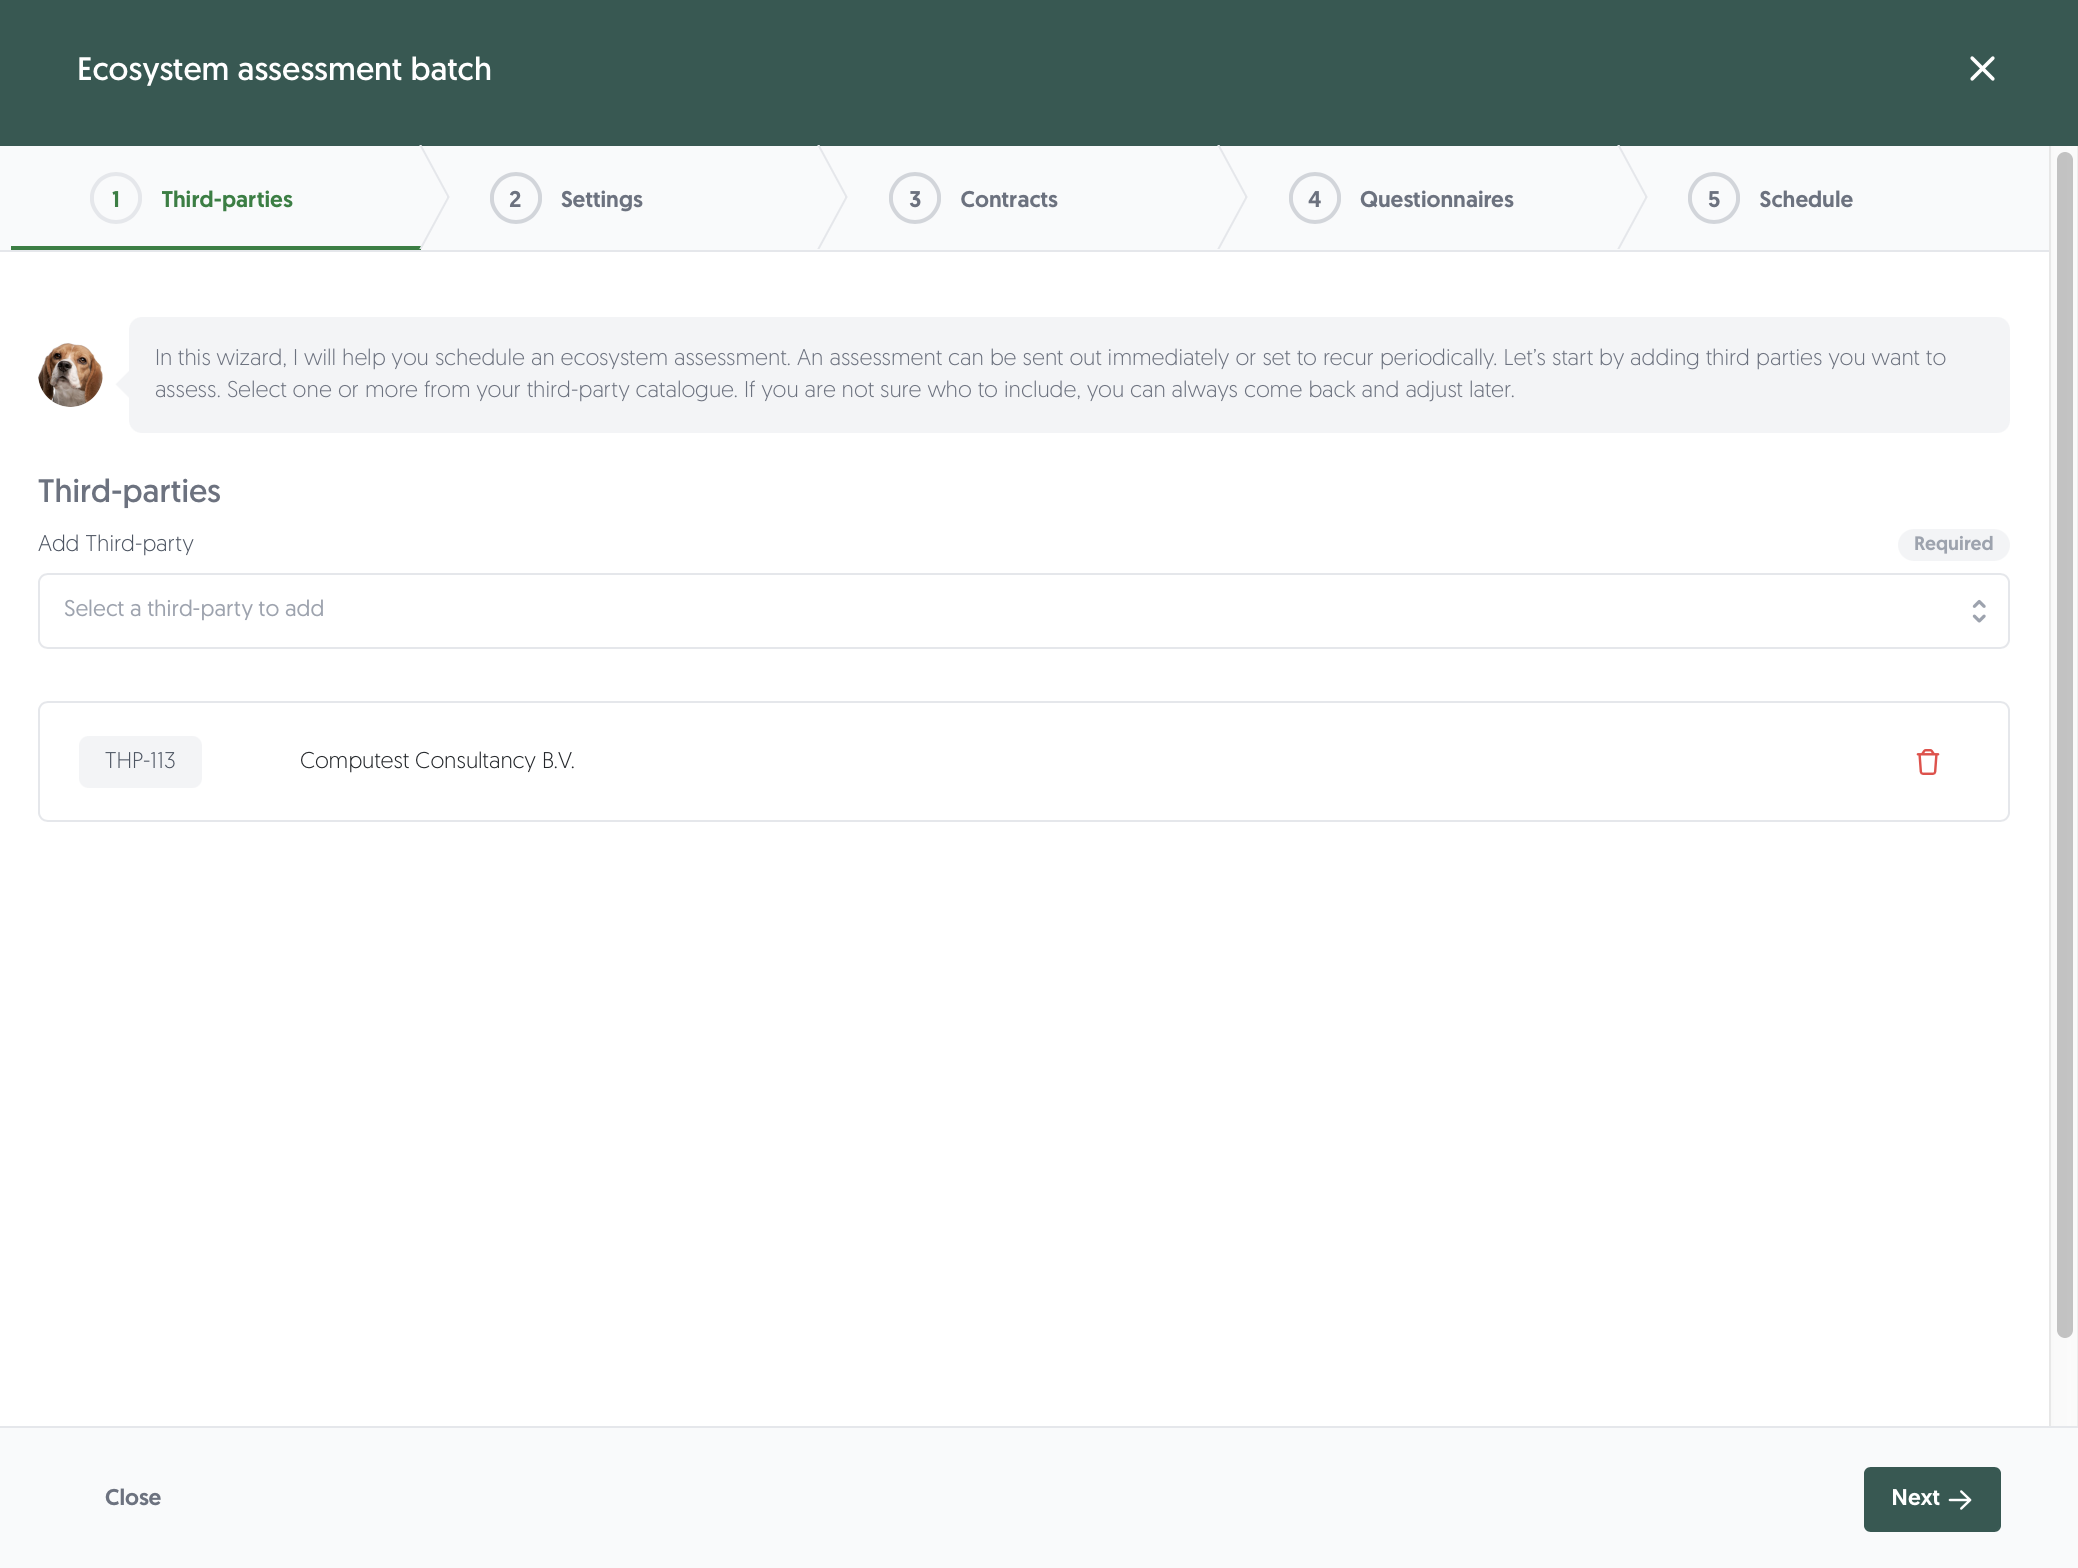
- Either way, the ecosystem assessment batch window will open:
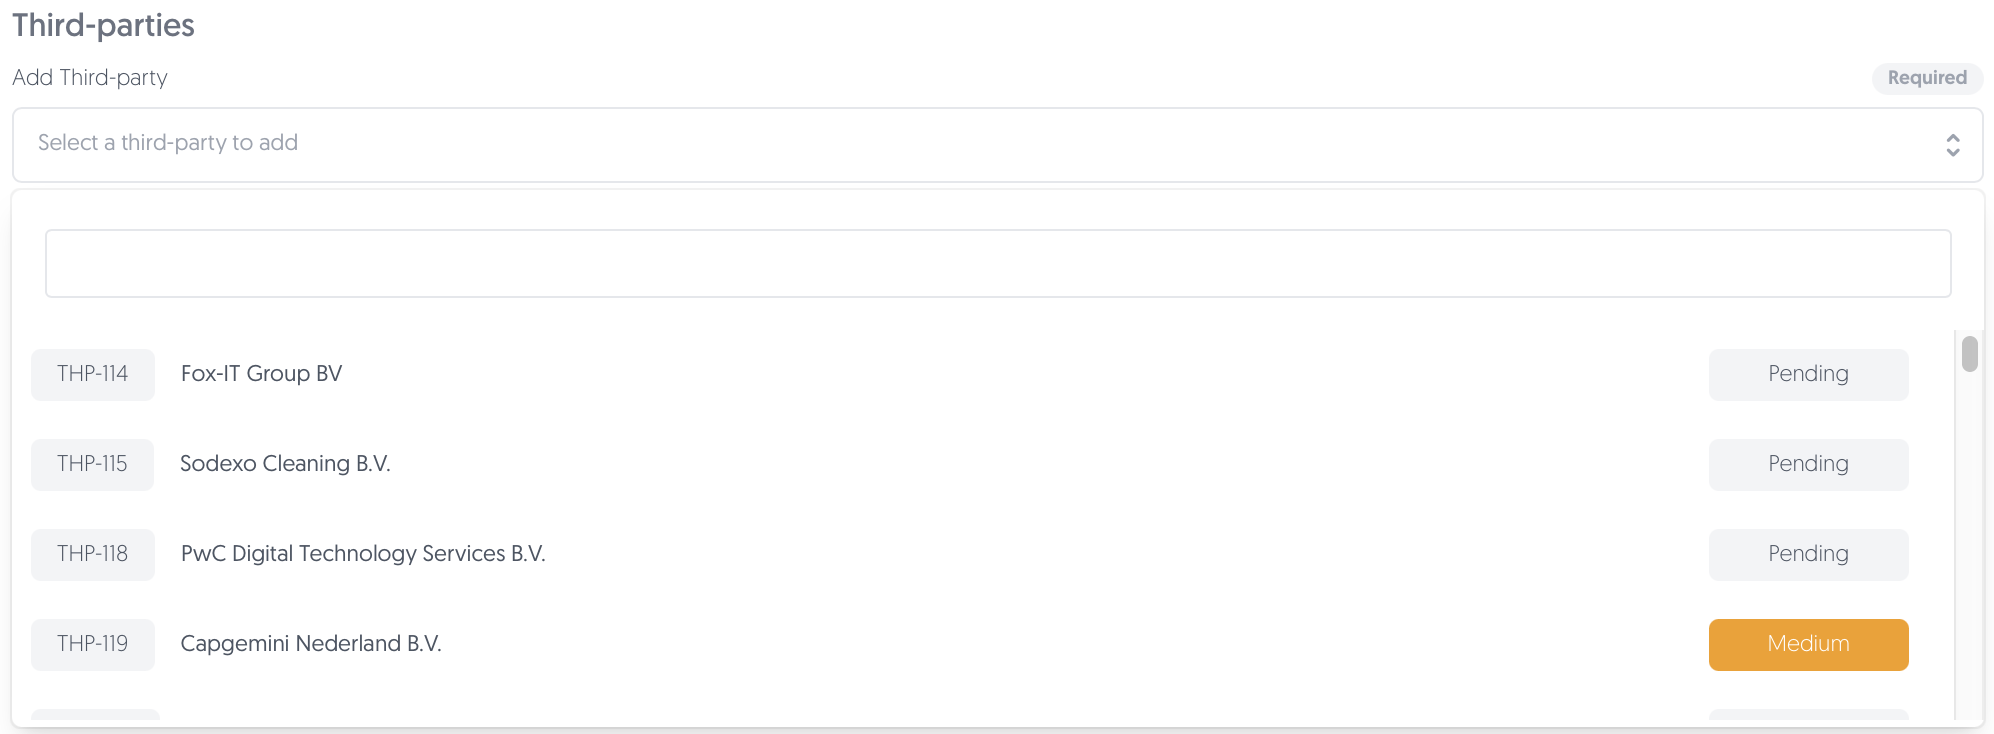
- Select any (additional) third-parties you want to assess. When a third-party has not been assessed yet, their risk profile is Pending:
- Fill in the assessment details on the next page. Specify the number of days the third party has to submit the assessment.
- Next, link at least one relevant contract to the third parties you have selected. This helps ensure the assessments are aligned with your contractual agreements.
- Select at least one questionnaire to send out. Based on the third parties' risk profile and communication language, suggestions will be at the top. Also, you can use the virtual officer to automatically pick the best option(s).
Tip: Use the green search icon to open a questionnaire and quickly view the questions.
Learn more about questionnaires: Questionnaires - Before you move on, make sure to assign a reviewer for the questionnaire and its' domains. This is saved in the questionnaires' settings, but you can quickly adjust it here if necessary. Use the green search icon to open a questionnaire and confirm that the reviewers are set correctly.
Note: once assigned, these reviewers will become the default for this questionnaire, not just for this specific assessment batch. - Lastly, schedule in the assessment batch. It is possible to send out the assessments on a regular interval without manual action required (i.e. a schedule). Use the frequency menu to set a schedule and assign a schedule owner to keep track and assign ownership of the schedule. You can always view and manage all your batches in the Scheduler and Calendar.
- Click on Save to initiate the assessment batch. Your assessment will be sent out on the execution date.
2. Filling in the assessment
Once an assessment has been executed (initiated and sent out), the assessment has the status in progress. That means that we are awaiting a response from the third party. They will have received an invitation (and a password) via email to access the assessment portal to provide the answers. The email is set in the third-party contact details (under E-mail address for incoming assessments).
3. Review an assessment
An assessment needs to be reviewed when a third party has submitted it. The assigned reviewer get notified via email when the review of the provided answers can be performed.
Start the review
The reviewer can either open the link in the email or:
- Navigate to: Left side menu: Assessments - Ecosystem, then Review.
- For the assessment you would like to review, click on the ••• button in the Actions column on the right-hand side of the table.
- Click on Review assessment.
- The assessment page to review will open.
View the assessment page structure: Assessment page structure
Reviewing the answers
You can start reviewing answers by:
- Clicking on the green Start review button.
Note: if you have filters applied, you will start the review for the filtered selection. - Clicking on any question in the table.
Please note that all reviewers can review each other's questions by default. This can be practical in case of absence or workload. The associated reviewer will automatically be updated by the system when a review on a specific question is performed by someone else.
The question review window will open:
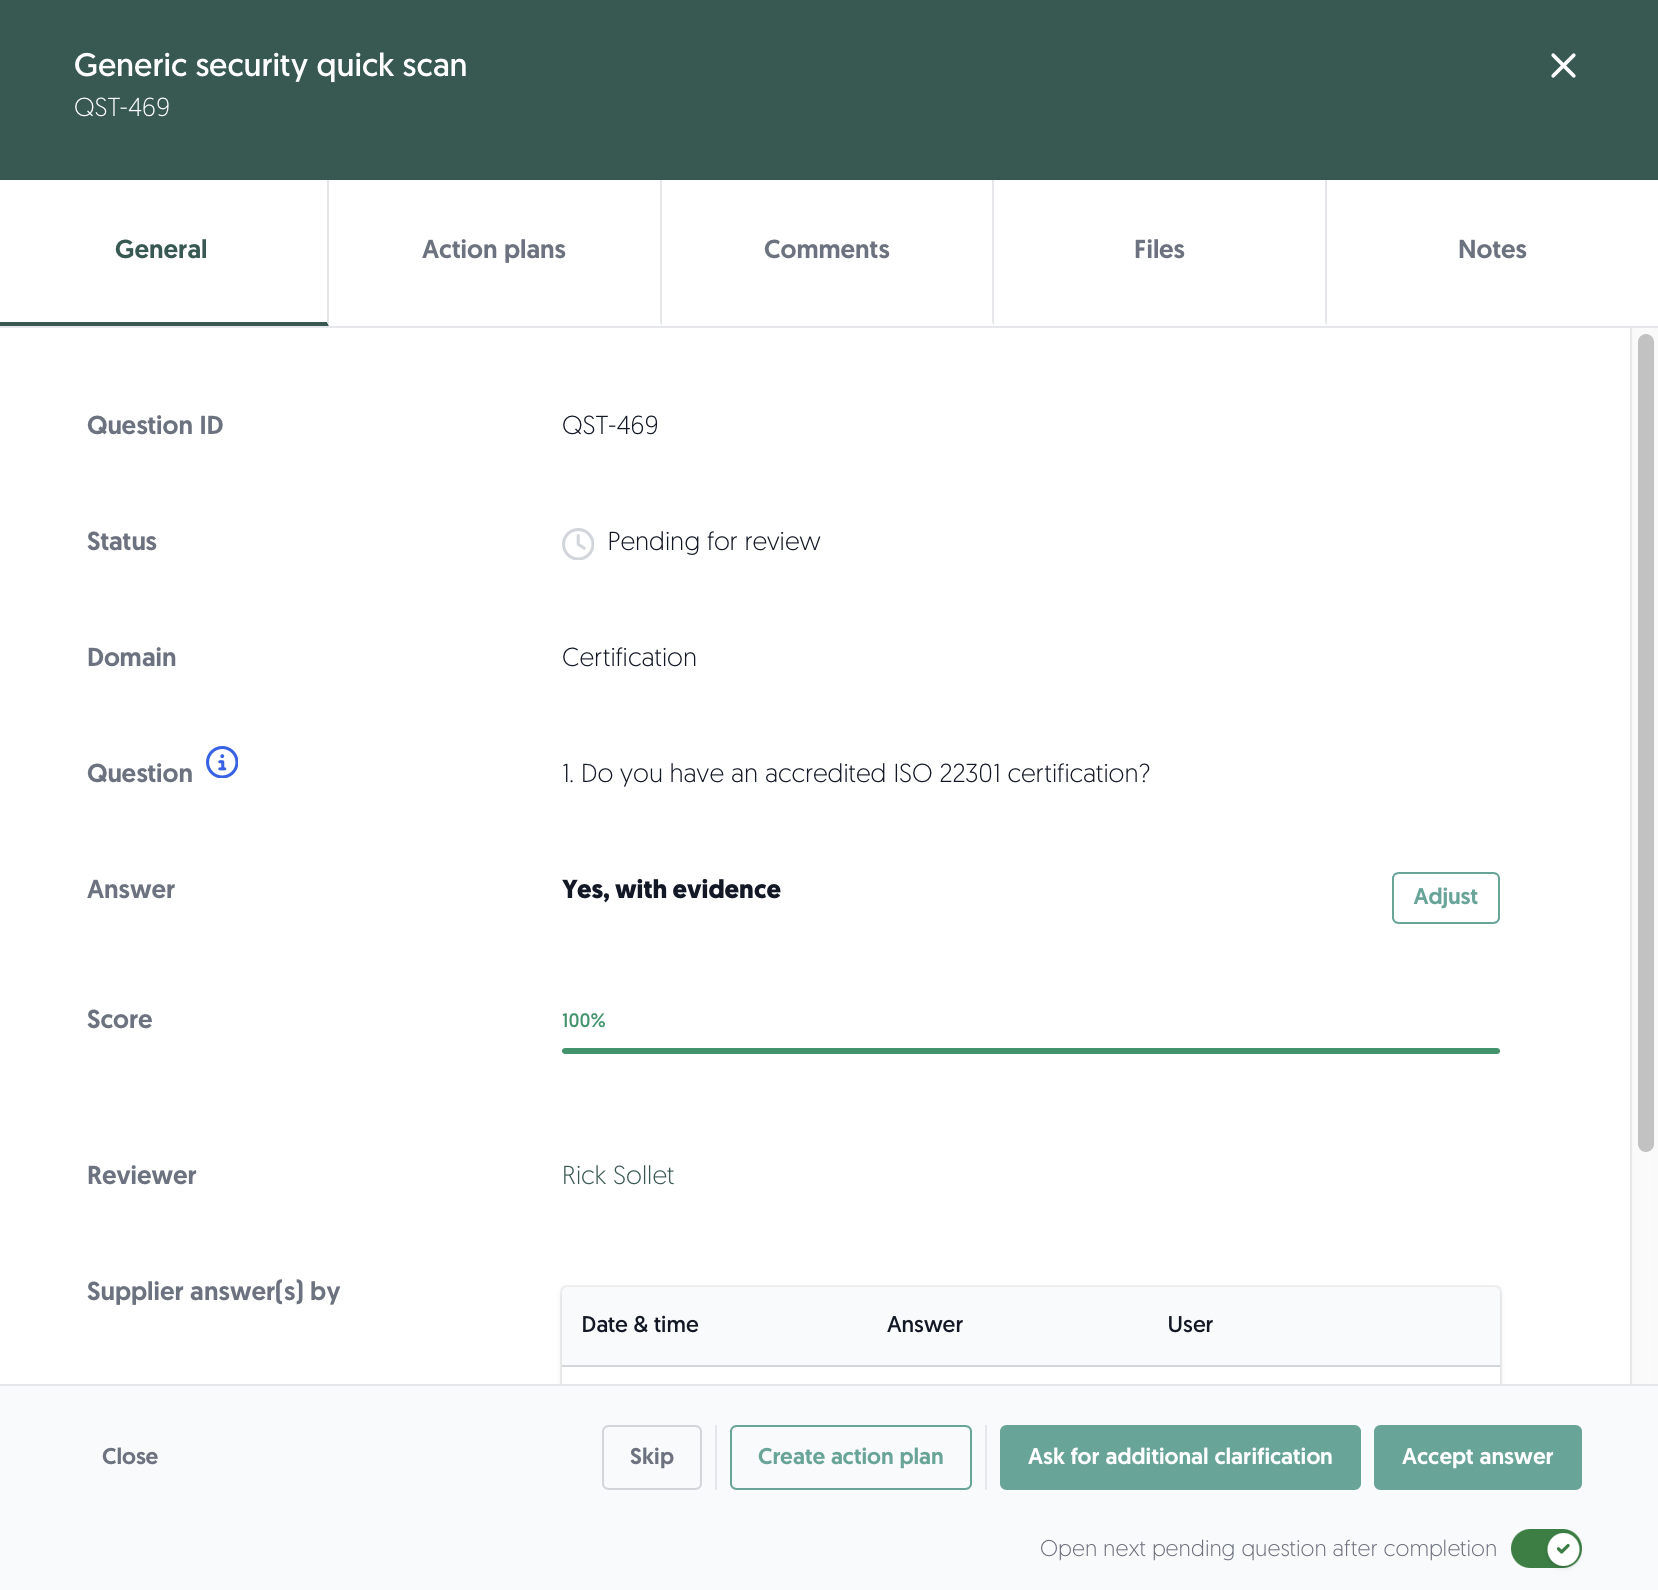
- The default General tab (above) provides a general overview of the question and answer. Among else, you can view the question, the provided answer, the calculated score and any provided context. Based on these fields, the reviewer makes a review decision.
Learn more about review decision options here: Review decision options
- As a reviewer, within the question review window, it is possible to:
- Adjust an answer. You will be asked to justify the adjustment. Click on the General tab.
- Create or link an existing action plan. This can be used to effectively follow up on any deficiencies related to the provided answer. Click on the Action plans tab.
Learn more about action plans here: Action plans - View, Download, Add or Delete files attached to the answer. Click on the Files tab for all options.
- Click on the ••• button to view, download or delete the file.
- Click on Download all files to download all uploaded files.
- Click on Add file to upload a file to attach to the answer.
- View comments. You can view the provided comments by the third party. Selecting Ask for additional clarification as the review decision lets you write a comment to the third party.
Learn more about review decision options here: Review decision options - Add notes. These are internal sticky notes that can only be seen by your internal colleagues and are not communicated to your third party. This can be handy to provide some additional context to your review decision. Click on the Notes tab.
Review decision options
The bottom of the question review window contains the review decision options. From left to right, your review decision options are:

| Review decision | Description |
| Close | Close the question review window and return to the review page. |
| Skip | Skip the review decision for this question to leave it for later. The next pending question review will open. |
| Create action plan | Based on the provided information and communication between you and the third party, you can decide to create an action plan. This can be used to effectively follow up on any deficiencies related to the provided answer. Learn more about action plans here: Action plans Afterwards, you can accept the answer knowing that the deficiencies are being tracked and acted upon. |
| Ask for additional clarification | Write a question to the third party in the Comments tab about the provided answer, comment and/or attached documents. Re-open the assessment portal to invite the third party to review the question. Learn more about re-opening the assessment portal here: Additional clarification needed |
| Accept the answer | Accept the answer based on the provided information and communication between you and the third party. The next pending question review will open (turn this off using the switch to stop reviewing questions). |
| Reset current status | Revert answer back to pending state. Only available after accepting an answer. |
Finalise the review
When you are done reviewing the answers, choose one of these options to finalise the review:
1. Finish assessment
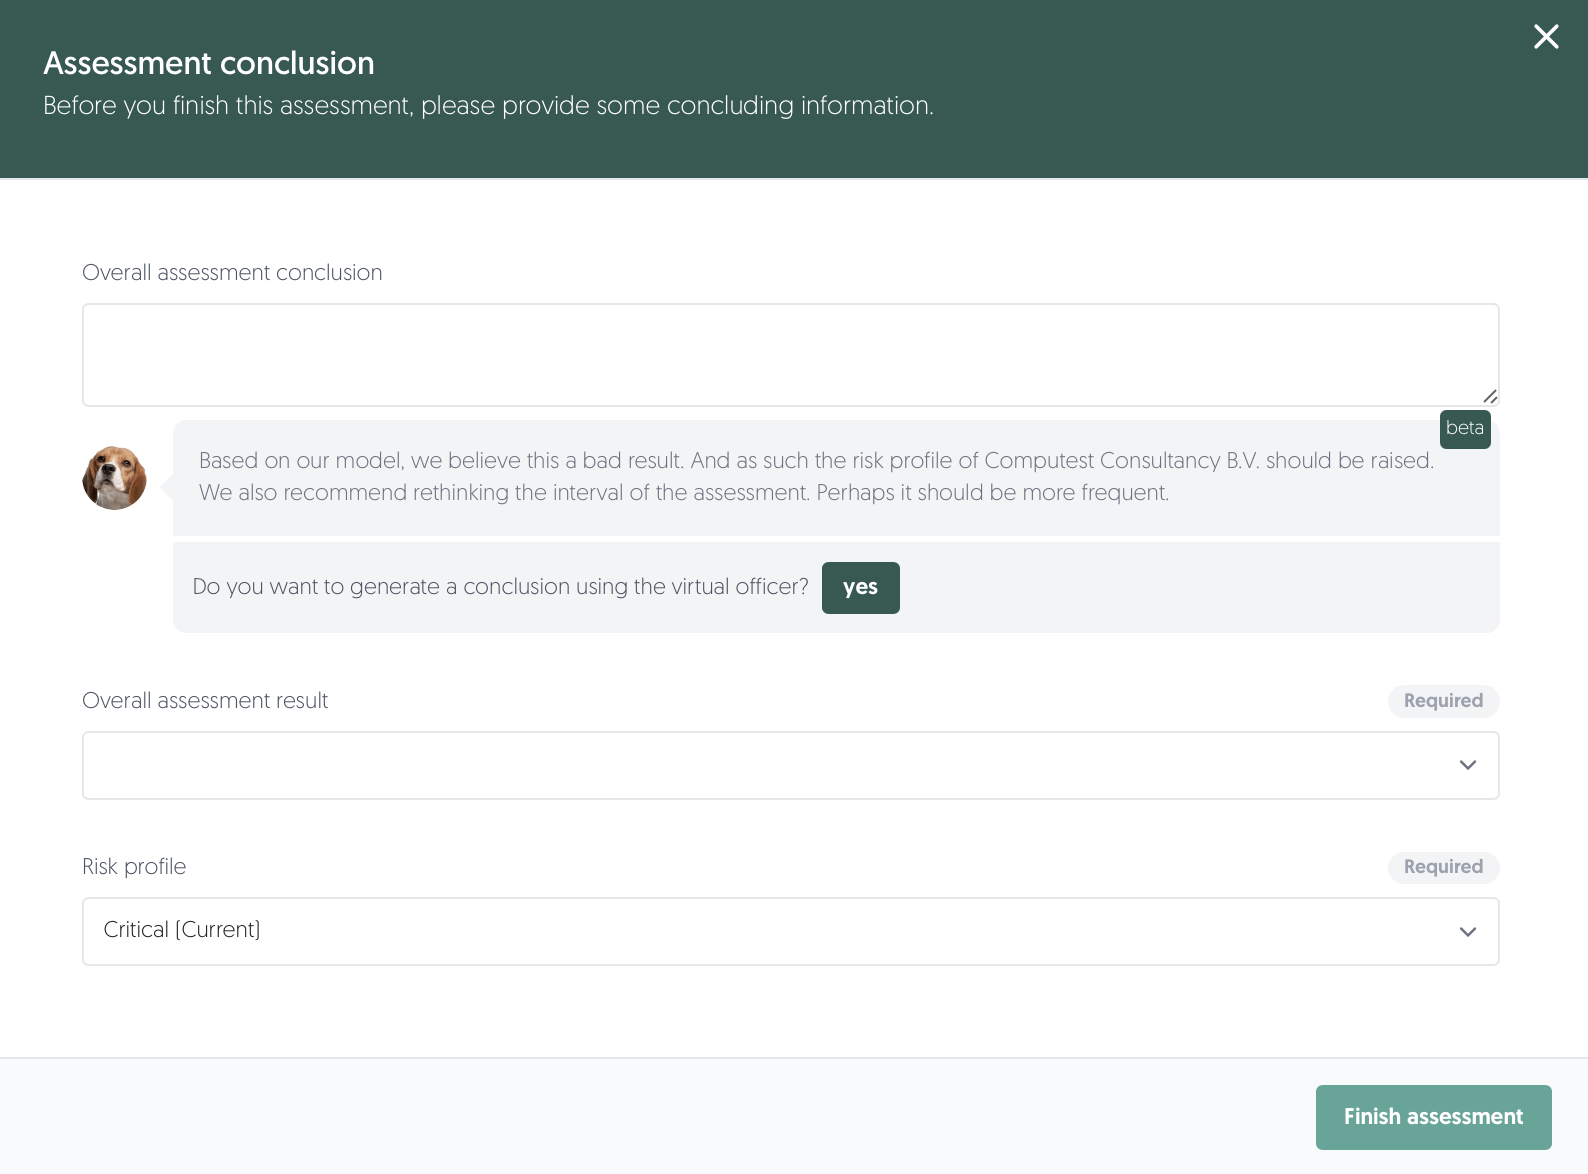
- After all questions have been reviewed and accepted, you will be able to finish the assessment. In the review page, click on Finish assessment.
- You will be asked to provide an overall assessment conclusion:
- Provide an optional concluding description of the assessment.
Tip: ask the Virtual officer to generate a conclusion using AI (beta feature). Saves you time. - Provide the overall assessment result. Your options are: good, acceptable, neutral, poor and critical.
- Based on your findings and conclusion, change the risk profile of the underlying contract if deemed necessary.
- Provide an optional concluding description of the assessment.
2. Additional clarification needed
- If there are any questions marked with Additional clarification needed, you cannot finish the assessment. When there are any questions marked with this status, you can re-open the assessment portal for the third party.
- The third party will receive a new invitation via email to review the questions marked with this status. They will be able to see your comment and adjust any fields of their answer.
- In the review page, click on Change status to in progress.
- You will be informed when the third party responds to your review comments. Clicking Start review starts the review only for the open questions.
3. Change status to verification
- Depending on your permissions, you might not be able to finish the assessment yourself. Instead of finishing the assessment, it's possible to move the assessment to the verification step.
- This means that another person has to verify your review. You will be asked to assign a user to verify the review and you may leave a comment for them. They will receive a notifications that they have been assigned to verify an assessment and will be able to finish the assessment.
- In the review page, click on Change status to verification.
Learn more about verifying assessments here: Verifying assessments
4. Verify an assessment
Assessments are put in the Verification phase after having been reviewed. The reviewer has done most of the work, and it is up to the verifier to assure the work has been performed correctly and to finish the assessment.
To start, the verifier can either open the link in the email or:
- Navigate to: Left side menu: Assessments - Ecosystem, then Verification.
- For the assessment you would like to verify, click on the ••• button in the Actions column on the right-hand side of your screen.
- Click on Verify assessment.
- The assessment page to verify will open.
View the assessment page structure: Assessment page structure - Verify the reviewed answers. As a verifier, it is possible to:
- View the accepted answers to verify they are correct and complete.
- If you encounter an incorrect or incomplete answer, click on Reset current status to set the answer back to pending. Leave an internal note for the reviewer to correct the incorrect or incomplete answer.
- Create or link an existing action plan. This can be used to effectively follow up on any deficiencies related to the provided answer. Click on the Action plans tab.
Learn more about action plans here: Action plans - View, Download, Add or Delete files attached to the answer. Click on the Files tab for all options.
- Click on the ••• button to view, download or delete the file.
- Click on Download all files to download all uploaded files.
- Click on Add file to upload a file to attach to the answer.
- View comments. You can view the provided comments by the third party. Selecting Ask for additional clarification as the review decision lets you write a comment to the third party.
Learn more about review decision options here: Review decision options - Add notes. These are internal sticky notes that can only be seen by your internal colleagues and are not communicated to your third party. This can be handy to provide some additional context to your review decision. Click on the Notes tab.
- After verifying all answers, you have two options to finalise the verification:
- Change status to review to assign the assessment back to the reviewer. Do this after using Reset current status on one or more answers. This will notify the reviewer that an assessment has been assigned back to them. You will be informed when the reviewer resubmits the review for verification.
- Finish assessment
- After all questions have been verified and accepted (in other words: unchanged from the review phase), you will be able to finish the assessment. In the verification page, click on Finish assessment.
- You will be asked to provide an overall assessment conclusion:
- Provide an optional concluding description of the assessment.
Tip: ask the Virtual officer to generate a conclusion using AI (beta feature). Saves you time. - Provide the overall assessment result. Your options are: good, acceptable, neutral, poor and critical.
- Based on your findings and conclusion, change the risk profile of the underlying contract if deemed necessary.
Assessment page structure
The assessment page consists of three main sections:
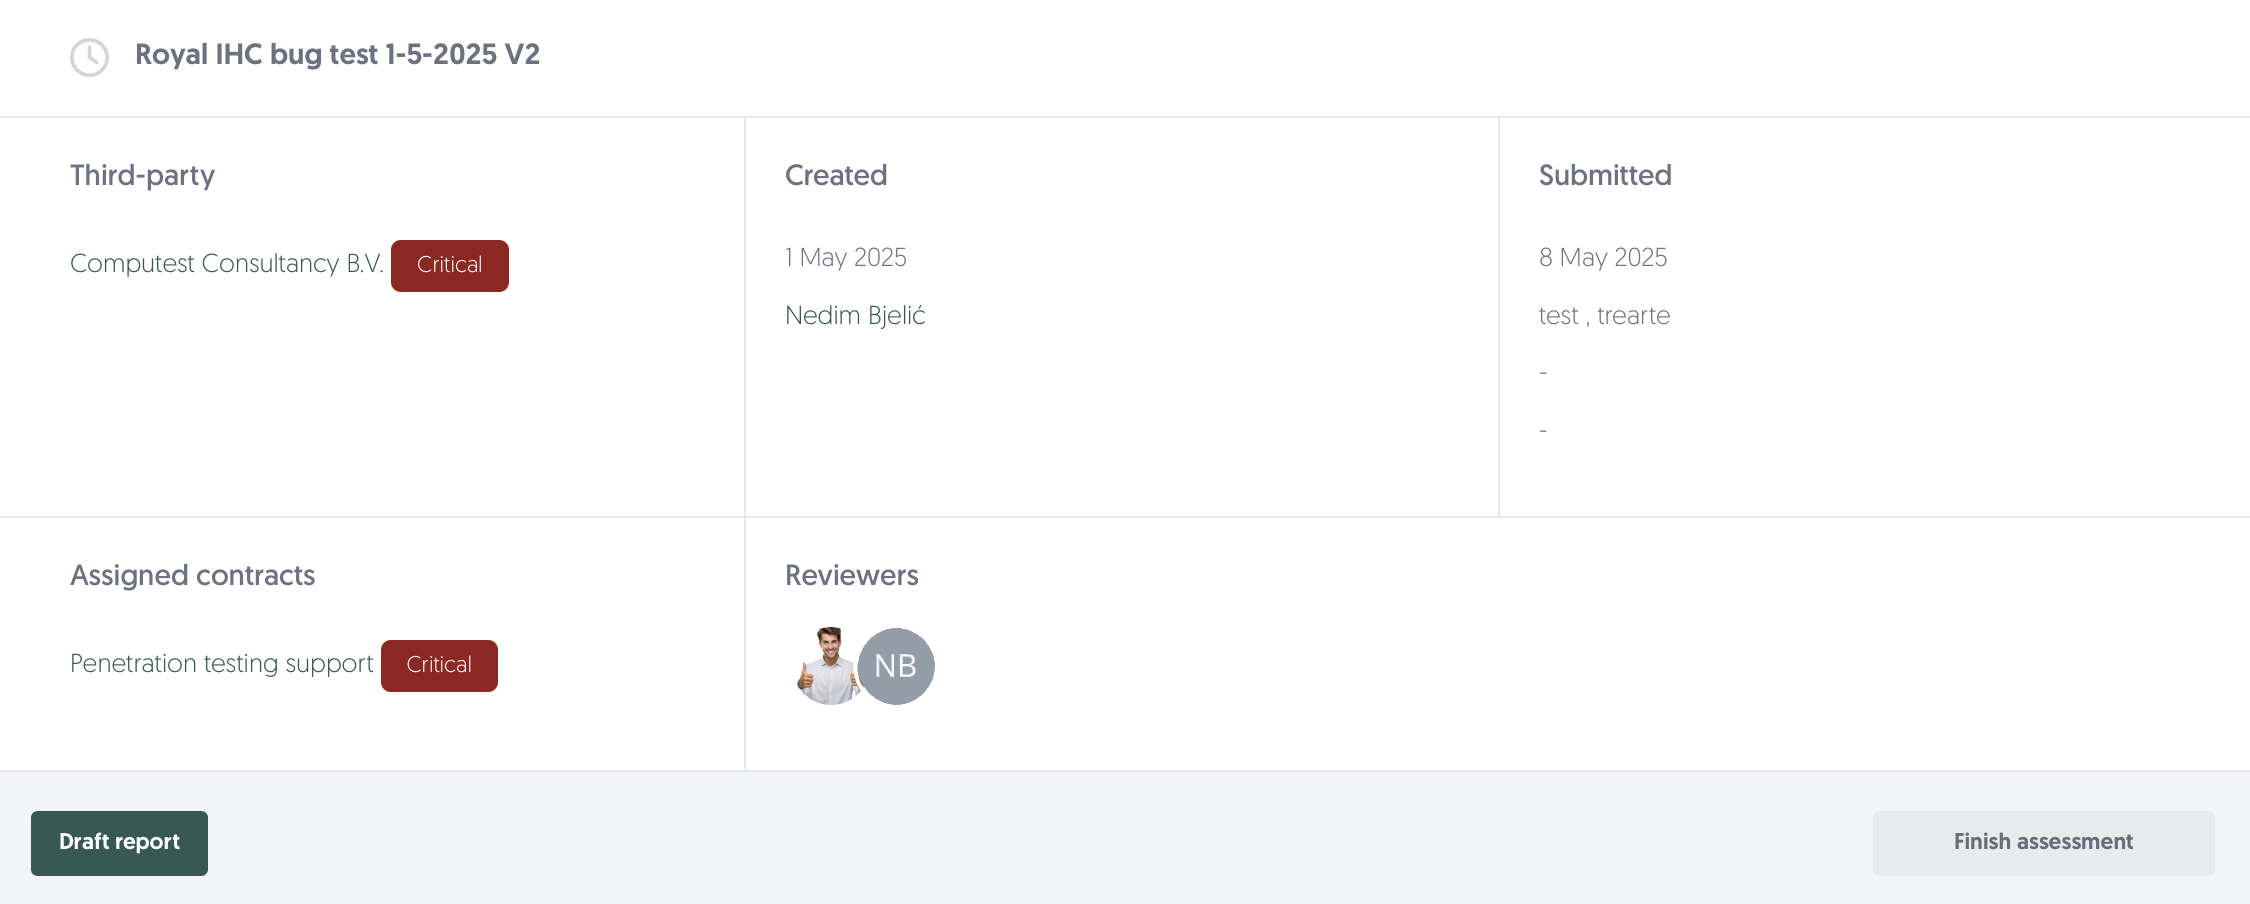
- Assessment characteristics
- The top section contains all the important characteristics of the assessment, such as the associated third-party and the underlying contract (including risk profiles), creation and submission information and the assigned reviewers. The actions you can take, vary per phase of the assessment.
- When in progress or finished:
- Click on Change status to review to move an incomplete assessment to be reviewed. Normally, an assessment will be moved to be reviewed when it is submitted by the third party.
- Click on Report to export the (incomplete) assessment as a pdf file. This makes it easy to share with colleagues or stakeholders.
- When reviewing:
- Click on Finish assessment when all answers have been reviewed to finish the review. You will be asked to provide an overall assessment conclusion.
- Click on Change status to verification to assign a second person to verify the assessment.
- Click on Draft report to export the assessment as a pdf file. This makes it easy to share with colleagues or stakeholders before finalising the results.
Learn more about reviewing assessments here: Reviewing assessments
- When verifying:
- Click on Finish assessment when all questions have been reviewed and verified. You will be asked to provide an overall assessment conclusion.
- Click on Change status to review to assign the assessment back to the reviewer. This is useful if you encountered incorrect or incomplete answers while verifying the assessment.
Learn more about verifying assessments here: Verifying assessments
- When in progress or finished:
- The top section contains all the important characteristics of the assessment, such as the associated third-party and the underlying contract (including risk profiles), creation and submission information and the assigned reviewers. The actions you can take, vary per phase of the assessment.
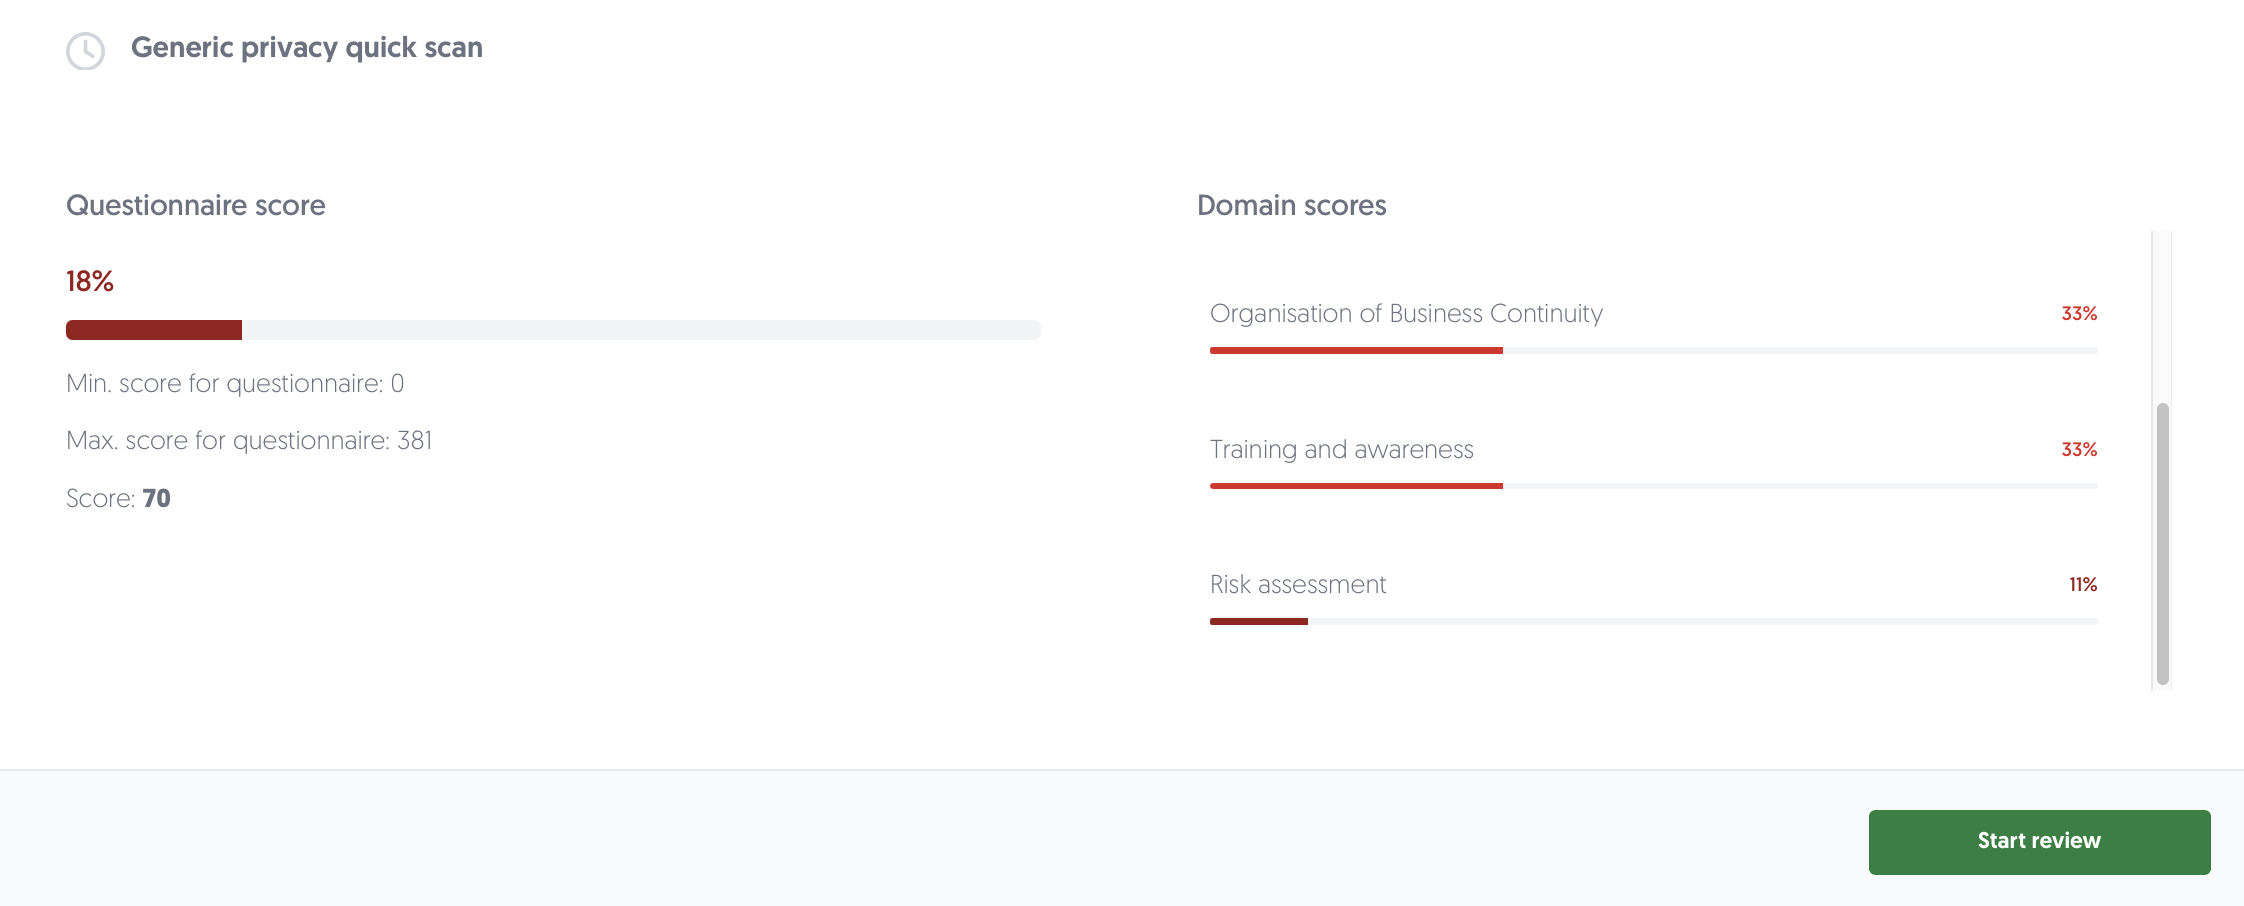
- Answer analysis
- The middle section offers a concise overview of the assessment results, including the overall questionnaire score and domain scores based on the answers provided by the third party. This helps you quickly identify potential problem areas that may need further review.
Learn more about assessment scoring here: Assessment scoring- Click on a domain under Domain scores to use it as a filter. The questions of that domain will be filtered in the bottom section.
- When reviewing:
- Click on Start review to start Reviewing the answers.
Learn more about reviewing answers here: Review answers
- Click on Start review to start Reviewing the answers.
- The middle section offers a concise overview of the assessment results, including the overall questionnaire score and domain scores based on the answers provided by the third party. This helps you quickly identify potential problem areas that may need further review.
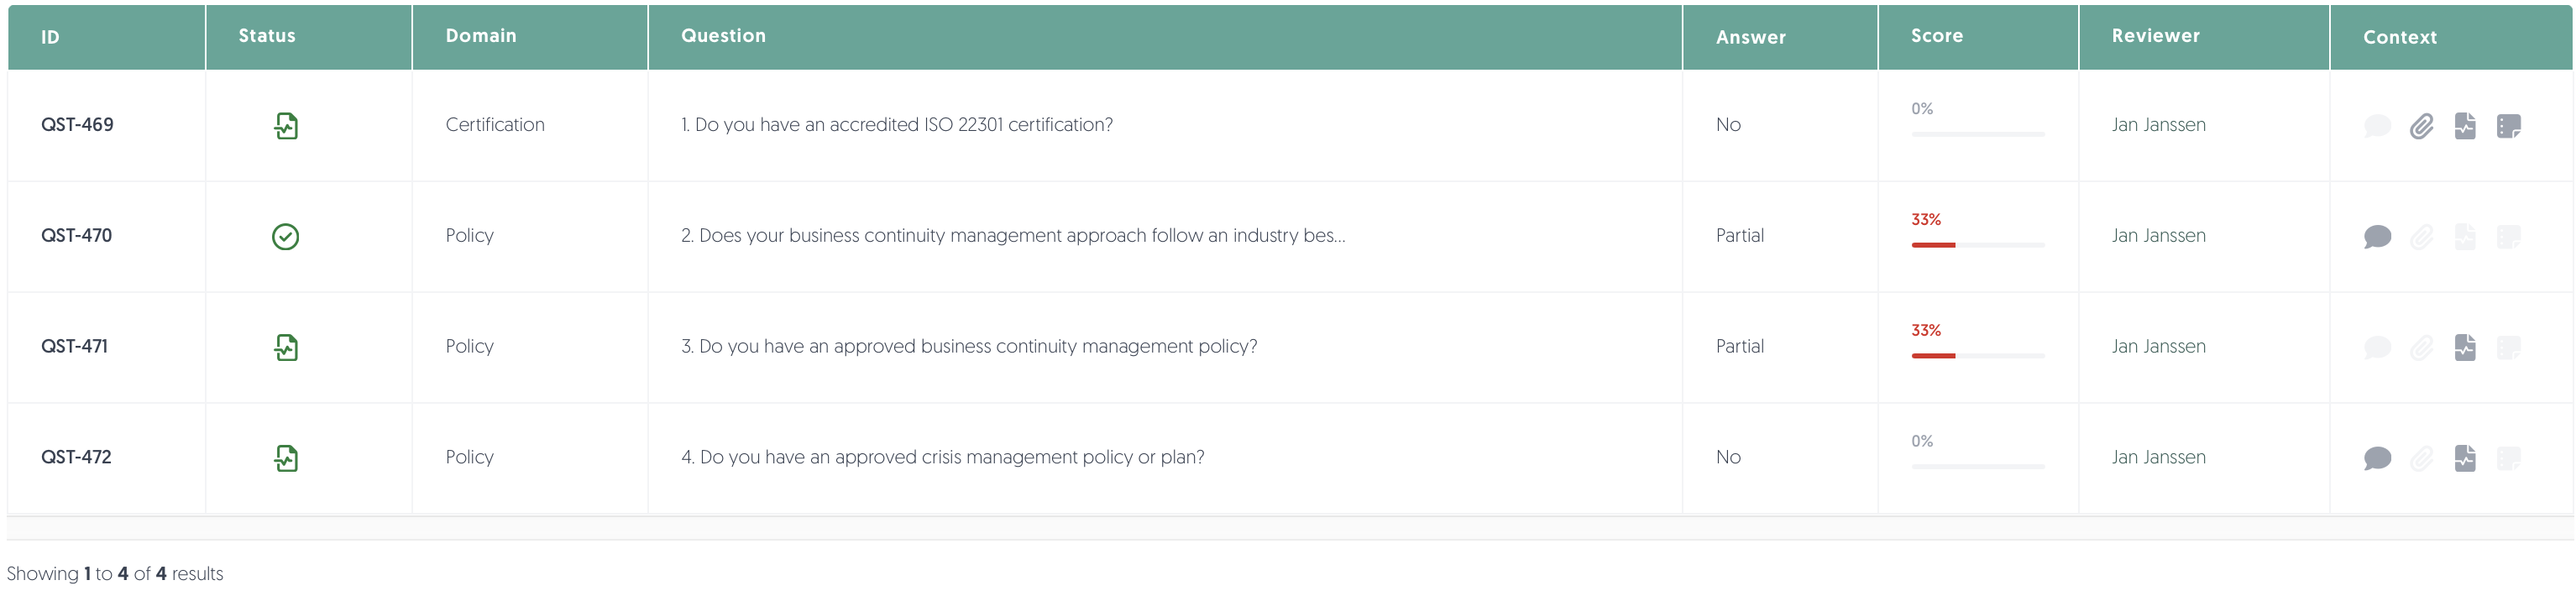
- Questions and answers table
The bottom section displays the assessments' questions and provided answers by the third party in the table.
Search, filter, bulk actions, and export
Above the table of the questions and answers, you will find options to search, filter, apply bulk actions, and export. From left to right:
- Search: You can search by question.
- Clear search: Quickly clear your search field and stop searching using this button.
- Filters: Apply filters using this button. If any filters are active, the text will change to Filters applied.
- Saved filters (↓ down arrow): You will find your saved filter sets here, as well as a button to save your current set of filters.
- Clear filters (strikethrough funnel): This will clear all filters, including any text in the search field.
- When reviewing:
- Bulk actions: If multiple rows have been selected, you can perform a bulk action on the selected rows.
- Mark as accepted: Use this button to accept all selected answers (without reviewing them).
Tip: You can use filters to, e.g. quickly filter on all questions with a score of >90% and accept them via this bulk action. This allows you to make effective use of your time and to focus on more problematic areas. - Reset to Pending for review: Use this button to revert previously accepted answers back to a pending state for further review.
- Mark as accepted: Use this button to accept all selected answers (without reviewing them).
- Bulk actions: If multiple rows have been selected, you can perform a bulk action on the selected rows.
- Export actions: Export question and answers to an Excel file.
- All results: This exports all questions and provided answers.
- Download all files: Download all attached files from provided answers.
- Number of rows per page: Choose the amount of rows you want displayed per page in the table.
Interacting with the table
- Select: Check the box in the leftmost column to select a row. You can select all visible questions and answers by checking the box in the header of the table. If you want to select all results, including ones on other pages, make sure to click Select all rows:
- Sort: Click on a column name to sort by that column. Note: sorting is not possible on some columns.
- Review answer: Click on a question to question review window.
Learn more about the question review window here: Question review window - On the right side, you'll find a contextual overview of each question, including (in order): external comments, attachments, linked action plans, and internal notes. Click on an icon to view the context.
- Details: Hover on a data field to get more details.