
Microsoft Entra ID user provisioning (SCIM)
3rdRisk supports SCIM 2.0, the standard protocol identity providers use to create, update and deactivate accounts in another system. By connecting Microsoft Entra ID (formerly Azure AD) to your 3rdRisk environment over SCIM, your existing groups decide who has access to the platform and what they can do, and you stop maintaining user accounts in two places.
This article is written for the administrator who sets this up: it needs both an Entra ID administrator and someone who knows which 3rdRisk roles your organisation uses. Single sign-on is configured separately from provisioning — the two can be used independently, and neither requires the other. Most organisations want both: provisioning creates and deactivates the accounts, and single sign-on is how people then get in.
Learn more about signing in: Single sign-on
Overview
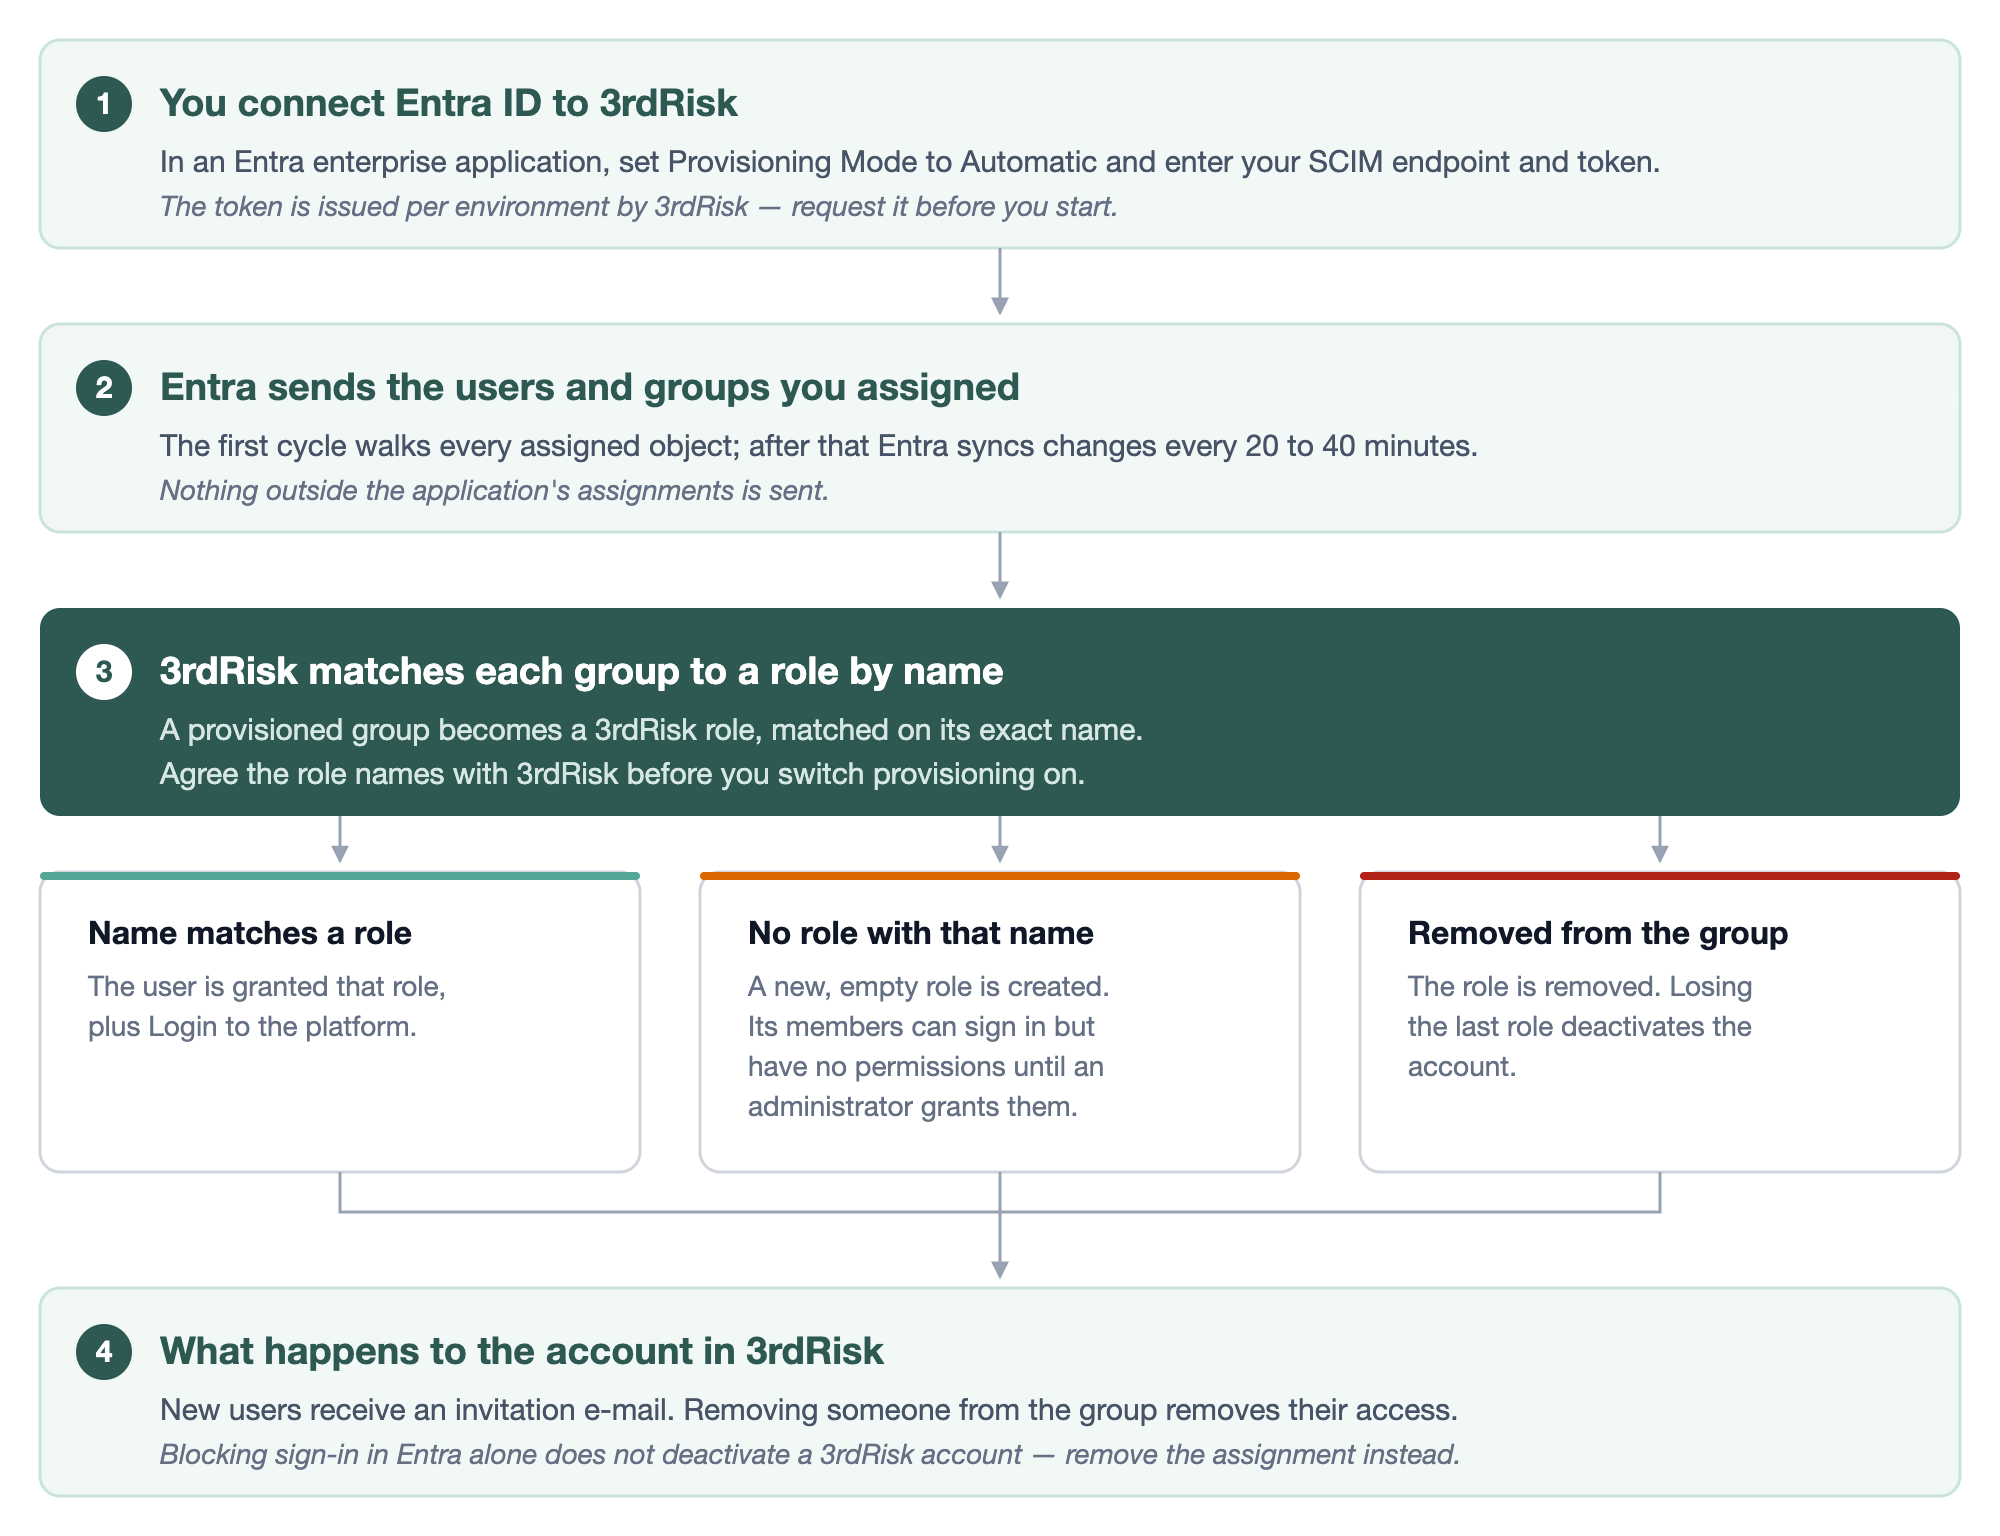
Once provisioning is switched on, Entra ID pushes the users and groups you have assigned to the application. 3rdRisk creates each user, matches each group to a role of the same name, and grants that role to the group's members. From then on, membership of the Entra group is what controls access — you add and remove people in Entra, not in 3rdRisk.
Permissions needed: to prepare and check the setup in the platform you need Roles (read and update) and Users (read). The SCIM connection itself is authenticated by its own token and does not consume a user account or a licence seat.
To grant these permissions, navigate to: Left menu: Configuration, then Roles, and edit the role of the administrator who will do the work.
Learn more about accounts in the platform: Users
Before you start
- A Microsoft Entra ID P1 or P2 licence. Automatic provisioning for enterprise applications is a paid Entra feature.
- An Entra ID administrator role: Global Administrator, Application Administrator or Cloud Application Administrator.
- Your SCIM endpoint. This is the address you use to sign in to 3rdRisk followed by
/scim/v2, sohttps://<your-3rdrisk-domain>/scim/v2.
- Your SCIM token. The token is generated for your environment and is not shown anywhere in the platform. Request it from 3rdRiskSupport@diligent.com before you begin, and treat it as a password: it grants the right to create and remove accounts.
- A decision on group names. This is the part that most often needs work up front, and it is the first step below.
Note: no firewall changes or IP allow-listing are needed. Entra ID makes outbound HTTPS calls to your 3rdRisk environment.
1. Match your Entra groups to 3rdRisk roles
A provisioned group becomes a role in 3rdRisk, and the two are matched on the group's display name. That name is the only link between them: there is no picker in the platform where you connect a group to a role afterwards, so the names have to line up before you switch provisioning on.
Two things follow from that. A group whose name matches a role grants that role to its members. A group whose name matches nothing creates a new role with that name and no permissions at all — its members can sign in, but they can do nothing until an administrator gives that role its permissions.
The roles in your environment
Navigate to: Left menu: Configuration, then Roles for the authoritative list, because roles can be added and renamed and your environment may differ. A new environment starts with these:
- Administrator ecosystem
- Third-party manager
- Risk officer
- Risk manager
- External auditor
- Leadership
- Business manager
- Ecosystem reviewer
- External reviewer
- Administrator internal control
- Control executor - 1st line
- Control validator - 2nd line
- Internal auditor - 3rd line
- Internal control manager
- Api token Administrator
- Login to the platform
Note: you do not need a group for Login to the platform. Every user provisioned into any other role receives it automatically, and it is what allows them to sign in at all.
Name your groups with the 3rdRisk prefix
Most organisations cannot name a security group plainly Third-party manager, because their directory needs to show which application a group belongs to. The convention we recommend is to prefix the role name with `3rdRisk - `:
Entra ID group | 3rdRisk role it grants |
|---|---|
| Third-party manager |
| Risk officer |
| Administrator ecosystem |
Entra then removes the prefix before sending the name to 3rdRisk, using an expression on the group mapping:
- In the application, open Provisioning, then Mappings, then Provision Microsoft Entra ID Groups.
- Click on the
displayNameattribute mapping.
- Set Mapping type to Expression and enter:
IIF(Left([displayName], 10) = "3rdRisk - ", Mid([displayName], 11, 9999), [displayName])- Click on Ok, then Save.
The expression strips exactly the ten characters of `3rdRisk - ` when it is present, and passes any other group name through unchanged, so a group that does not follow the convention still works as long as its name matches a role exactly.
Note: everything after the prefix must match the role name character for character, including capitals, spaces and hyphens. 3rdRisk - Third party manager does not match the role Third-party manager.
If you cannot use that prefix
Two alternatives, both supported:
- Rename the roles in 3rdRisk to match your groups. Navigate to: Left menu: Configuration, then Roles, open the role, change its Name to the exact name of your Entra group, and Click on Save. Renaming changes nothing else: the role keeps its permissions, its role type and its automatic permission updates, and everyone who already holds it keeps it. Role names must be unique.
- Do not provision groups at all. Provision only users, leave Provision Microsoft Entra ID Groups disabled, and assign roles inside 3rdRisk under Configuration, then Users. Entra then manages who has an account and you manage what they can do. This is the simplest option for a small number of users, at the cost of no longer having access follow group membership.
One person, several groups
A user in more than one provisioned group receives every matching role, which is how you compose access from a base role and an additional one. Some combinations are mutually exclusive, because holding both roles would violate segregation of duties — Third-party manager and Business manager, for example — and the platform refuses those over SCI exactly as it refuses them in the interface. Work out which combinations your grou memberships can produce before you switch provisioning on, because a refused member never receives the role.
Learn more about which roles exclude each other: Users
2. Create the enterprise application
- Go to the Microsoft Entra admin center and navigate to: Identity, then Applications, then Enterprise applications.
- Click on New application, then on Create your own application.
- Give it a name, for example
3rdRisk.
- Select Integrate any other application you don't find in the gallery (Non-gallery) and Click on Create.
3. Assign the users and groups
- In the new application, open Users and groups.
- Click on Add user/group and assign the groups you prepared in step 1. Assigning groups rather than individual users is what makes the rest of this setup maintainable.
Only assigned users and groups are provisioned, as long as you keep the default scope in step 6.
4. Connect to the 3rdRisk SCIM endpoint
- In the application, open Provisioning and Click on Get started.
- Set Provisioning Mode to Automatic.
- Under Admin Credentials, fill in:
Field | Value |
|---|---|
Tenant URL |
|
Secret Token | the token supplied by 3rdRisk |
- Click on Test Connection. Entra confirms that the credentials are authorised.
- Click on Save.
Note: the endpoint must end in /scim/v2 without a trailing slash. A shorter address such as /scim is not a valid SCIM endpoint and returns an error.
If the test fails, the message tells you which of the two values is wrong:
- Unauthorized, or a 401 error: the token is incorrect or has been replaced. Request a current one.
- Not found, or a 404 error: the address is wrong. Check the domain and that the path is exactly
/scim/v2.
5. Map the attributes
Open Provisioning, then Mappings.
Users
Leave Provision Microsoft Entra ID Users enabled. These are the attributes 3rdRisk uses:
Entra ID attribute | SCIM attribute | Notes |
|---|---|---|
|
| Required, and it must be a valid e-mail address, because it becomes the user's login. If your user principal names are not e-mail addresses, map |
|
| The name shown throughout the platform. If it is empty, the login address is used instead. |
|
| Set this mapping explicitly. It is the stable link between the two systems, and provisioning cannot reconcile an account without it. |
|
| Optional. Fills the job title on the profile. |
|
| Used as the e-mail address when |
|
| Optional, and applied when a user is updated. New accounts start in your organisation's default language. |
You can leave the remaining default mappings in place. 3rdRisk ignores attributes it does not use, so they cause no errors.
Groups
Enable Provision Microsoft Entra ID Groups if you want Entra groups to control roles in 3rdRisk, and keep these three mappings:
Entra ID attribute | SCIM attribute | Notes |
|---|---|---|
|
| The name matched against your 3rdRisk roles. This is the mapping that carries the prefix-stripping expression from step 1. |
|
| Set this mapping explicitly, as for users. |
|
| The membership that drives who gets the role. |
When a user is added to a provisioned group, 3rdRisk grants them that role together with the baseline Login to the platform role. When their last role is removed, the account is deactivated.
6. Set the scope and switch provisioning on
- Under Settings, set Scope to Sync only assigned users and groups.
- Fill in a Notification Email and tick the box that alerts you when provisioning fails.
- Set Provisioning Status to On and Click on Save.
The first cycle starts within a few minutes and walks every assigned object. After that, Entra sends changes incrementally, every 20 to 40 minutes.
7. Verify the result
- Use Provision on demand in Entra to push a single test user through immediately and read the result step by step.
- Open Provisioning logs for per-user detail on what was sent and what came back.
- In 3rdRisk, navigate to: Left menu: Configuration, then Roles, and check that no unexpected new role has appeared. A role you did not create, holding no permissions, is a group whose name did not match — correct the name and the next cycle will put its members in the right role.
- Navigate to: Left menu: Configuration, then Users, and confirm the account exists with the correct e-mail address, name and role.
New accounts receive an invitation e-mail from 3rdRisk, so the person can complete their sign-in.
Note: a 409 in the provisioning log means an account with that e-mail address already exists in 3rdRisk. Contact 3rdRiskSupport@diligent.com so the existing account is linked instead of a duplicate being created.
Note: a 400 in the provisioning log with the message "The following roles are conflicting" means the member already holds a role that cannot be combined with the one this group grants. The whole operation is refused, so the member receives no role at all, and the identity provider retries the same change every cycle until the membership is corrected. Remove the person from one of the two groups, or change which role one of those groups maps to.
Removing access
Remove the person from the provisioned Entra group, or remove their assignment to the application. 3rdRisk then removes the matching role, and deactivates the account once it has no roles left.
Note: blocking sign-in for an account in Entra ID does not deactivate the matching 3rdRisk account on its own. Use group membership or the application assignment for off-boarding, so that access is withdrawn in both systems.
Technical reference
The endpoints below sit under https://<your-3rdrisk-domain>/scim/v2. Every request needs the header Authorization: Bearer <your token>. The base address itself serves no content, so opening it in a browser returns a not-found error even when everything is configured correctly.
Resource | Supported |
|---|---|
| Read, for identity providers that discover capabilities automatically. |
| List, create, read, update and delete. |
| List, create, read, update and delete. |
Filtering | On |
Patch | Supported, which is how Entra ID sends changes. |
Bulk operations, sorting, password changes and ETags are not supported. None of them is required by Entra ID.
Known limitations
- Changes to the
activeflag are not applied to existing accounts. Blocking or disabling a user in Entra ID leaves the 3rdRisk account active. Remove the group membership or the application assignment instead, as described under Removing access.
- Groups are matched to roles by name, not by identifier. Renaming a role in 3rdRisk, or a group in Entra ID, breaks the link between them, and a group whose name matches no role creates a new empty role rather than reporting an error.
- Conflicting roles are refused over SCIM. Some role combinations are mutually exclusive, because one person holding both would violate segregation of duties. When a provisioned group would grant a member a role that conflicts with one they already hold, the platform refuses the operation with a 400 and the message "The following roles are conflicting", and the member receives no role. Until the group membership is corrected, the identity provider retries the same change on every cycle and the provisioning run keeps failing. Review the combinations your group memberships can produce.
- Permissions are never provisioned. SCIM decides which role someone holds; what that role may do is always configured in 3rdRisk under Configuration, then Roles.
preferredLanguageis applied on updates only. A newly created account starts in your organisation's default language.
- One token per environment. The token is shared by every integration using SCIM in that environment, and replacing it means updating it in Entra ID as well.